Fix HDD Usage 100% on Windows 11/10: 9 Simple Solutions
In this post, we will cover how to resolve HDD usage 100 percent on Windows 11/10 with 9 effective solutions, and show you an easy way to upgrade hard drive to a larger drive without data loss.
By Jonna Updated on April 25, 2025
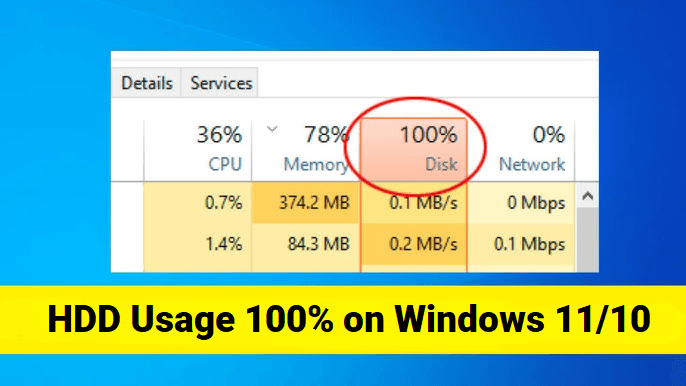
Why is My HDD Usage 100% on Windows 11?
Disk usage refers to how much of your computer's storage drive, usually your HDD or SSD, is currently being used by files, applications, and the operating system. It’s measured as a percentage and reflects how intensively the drive is being accessed at any given moment.
If the HDD usage is 100 percent on Windows 11/10, your system may become painfully slow, your apps freeze for no reason, and the boot process takes an eternity. There are some reasons that may lead to this problem:
- Background services like Windows Search or SuperFetch are constantly accessing the disk.
- Outdated or corrupted device drivers are causing excessive disk read/write operations.
- Insufficient virtual memory or improperly set paging file settings.
- Disk errors or file system corruption.
- Real-time antivirus scanning that overwhelms the drive.
- Fragmentation or lack of storage space.
- Faulty hardware.
If you need to upgrade HDD to a larger HDD/SSD to get rid of disk full problem completely, try the disk cloning software for seamless data migration.
How to Resolve HDD Usage 100 Percent on Windows 11/10
If you're stuck with HDD 100% usage in Windows 11 and feeling frustrated, try these reliable methods below to get your system back to optimal performance.
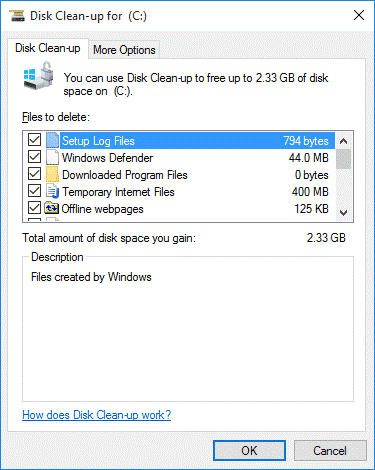
Way 1. Run Disk Cleanup
Disk Cleanup is a Windows built-in utility that helps you clear up space and reduce unnecessary disk activity. You can run it to relieve Windows HDD 100% usage with the steps below:
Step 1. Press Win + S, and type Disk Cleanup to open the software.
Step 2. Choose your target HDD and click OK.
Step 3. Select the file types to delete (e.g., Temporary files, System error memory dump files). And click Clean up system files for a deeper scan, if there is such a button.
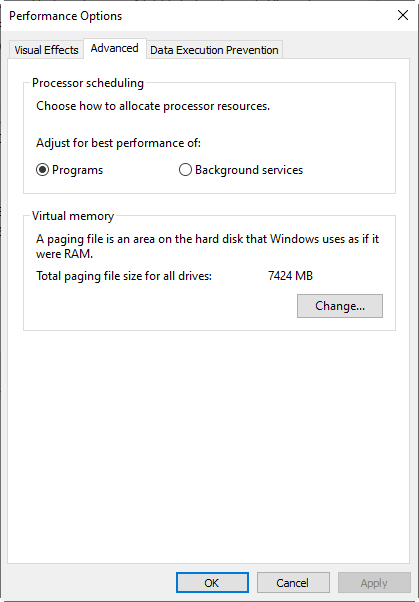
Way 2. Reset Virtual Memory for Hard Drive
Windows uses virtual memory as a supplement when physical RAM runs low. Misconfigured virtual memory can lead to HDD usage 100 percent in Windows 11/10. Here is how to reset it:
Step 1. Press Windows + R, type sysdm.cpl, and hit Enter to open System Properties.
Step 2. Click on Settings under the Advanced tab, then select the Advanced tab again, and click Change under Virtual memory.
Step 3. Uncheck Automatically manage paging file size, select your target HDD, and select Custom size to set an Initial size and Maximum size for your virtual memory.
- Initial size - If you are not sure what value to use, simply enter the value from the Recommended category.
- Maximum size - The maximum size should be approximately 1.5 times the physical RAM size. For example, a computer with 8 GB (8,192 MB) of RAM should have no more than 12,288 MB (8192 MB x 1.5) of virtual memory.
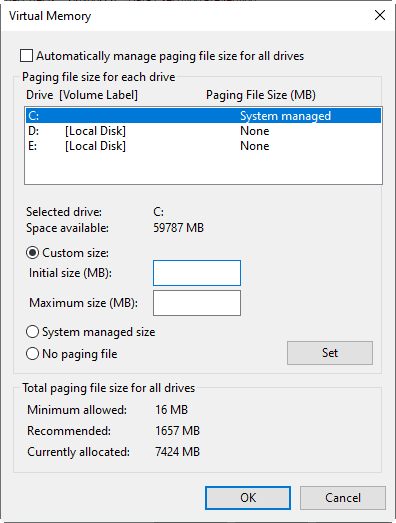
Step 4. Click Set, then OK, and restart your PC.
Way 3. Check Disk Errors
Sometimes, Disk corruption can cause Windows to crash with 100% HDD usage on Windows 11. The Check Disk utility can help detect and fix disk errors.
Step 1. Type cmd in the Windows Search box, and run Command Prompt as an administrator.
Step 2. Then, type chkdsk C: /f /r /x (please replace "C:" with the disk you want to scan for) and press Enter.
Step 3. Type Y to confirm a scan at the next reboot.
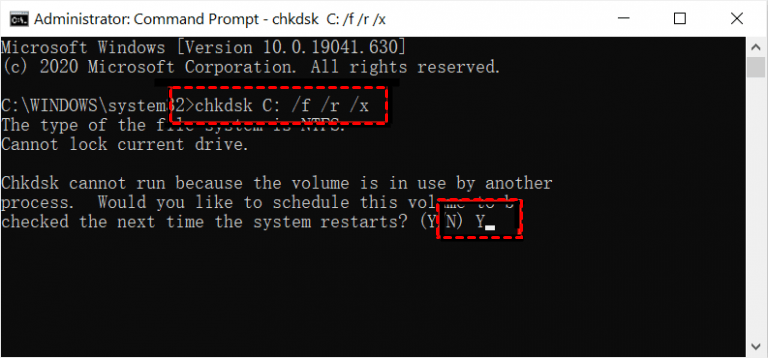
Step 4. Restart your computer, and Windows will scan and repair your drive on boot.
Way 4. Update Driver
Outdated or faulty storage drivers are another common cause of HDD on Windows 10/11 with 100% usage.
Step 1. Press Win + X and choose Device Manager.
Step 2. Expand Disk Drives, right-click your HDD, and select Update driver.
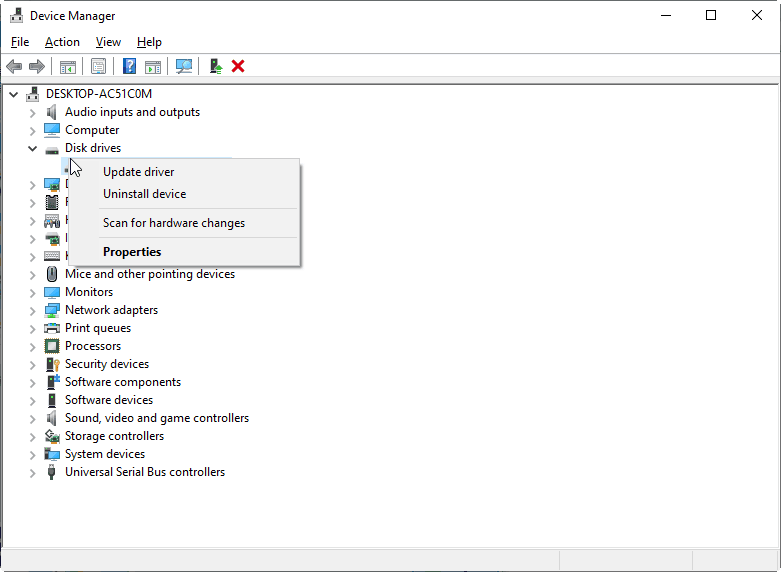
Step 3. Choose Search automatically for drivers.
Way 5. Disable Antivirus Software
While antivirus software protects your system, some can occupy your drive with real-time scans, especially on older or slower drives. So if you are running antivirus software, temporarily disable it and check if HDD showing 100% usage in Windows 10 or Windows 11 issue disappears. If it does, consider switching to a lighter antivirus.
Way 6. Rebuild Windows Search Index
Windows Search can occasionally go endlessly index files, leading to high disk usage on Windows. Here is how to reduce disk usage in Windows 11 by rebuilding the Windows Search index:
Step 1. Open the Indexing Options window by typing indexing options in the Windows search box and select it.
Step 2. Click on the Advanced button.
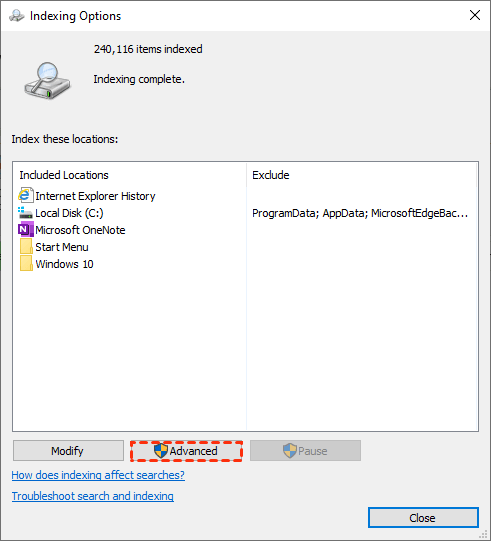
Step 3. Tap on Rebuild under the Troubleshooting tab.
Way 7. Change Power Options
Some users reported that setting Power Options to high performance will help to resolve Windows 11/10 100% disk usage on startup.
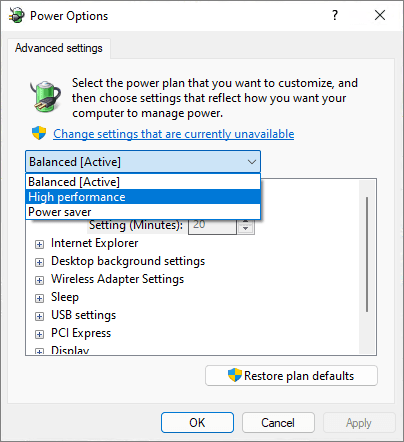
Step 1. Open Control Panel, select Power & Sleep, and go to Additional power settings.
Step 2. Go to Change plan settings > Change advanced power settings in turn.
Step 3. Then, expand the drop-down menu to select High performance, and click Restore plan defaults.
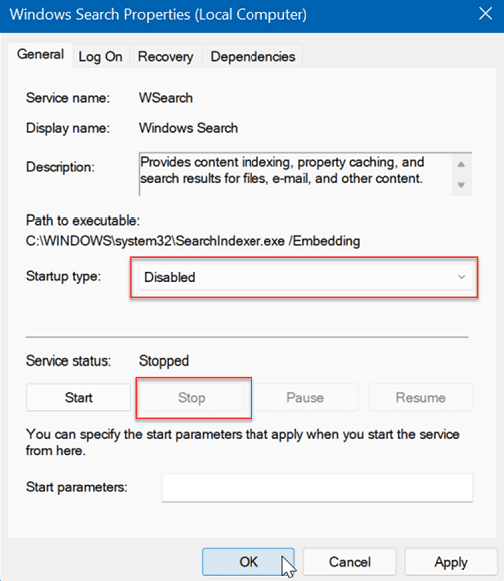
Way 8. Disable Windows Search
Windows Search is powerful to quickly find files, settings, or other needed content, but sometimes it can be very demanding on your hard drive, causing Windows 11 high disk usage. To disable it:
Step 1. Open the Windows run dialog by pressing the Win + R keys. Then, type services.msc to launch the Services console.
Step 2. Double-click on the Windows Search option, and set Startup type to Disabled. Then, click on Stop > OK.
Way 9. Disable SuperFetch Service
SuperFetch (also called SysMain) preloads frequently used apps into memory. It’s useful, but on some systems, it causes excessive disk usage, like 100% disk usage but nothing running on Windows.
Step 1. Press Windows + R, type services.msc, and hit Enter.
Step 2. Find SysMain, right-click it, and select Properties.
Step 3. Set Startup type to Disabled, and click Stop. Apply the changes and restart your system.
Bonus Tip: Upgrade to Larger HDD/SSD without Data Loss
Sometimes, your disk is just overwhelmed because it is too small. Upgrading to a larger HDD/SSD is the ultimate fix. How to migrate to a new drive without reinstalling Windows and data loss? AOMEI Cloner is the best helper. It is a trusted cloning tool designed for HDD-to-HDD and HDD-to-SSD cloning.

- Its Disk Clone allows you to migrate everything from one disk to another, including Windows OS, applications, and individual files/folders.
- Its System Clone aims to move only OS and boot-related partitions, ensuring a secure boot after cloning.
- Its Partition Clone enables you to copy a specific partition to new drive with ease.
You can choose to run it in the Intelligent Clone method (by default) to copy only the used space or in Sector By Sector Clone to copy every bit of your drive, including hidden data. The former allows you to easily migrate to a smaller drive, as well as clone a hard drive with bad sectors; the latter lets you create an exact copy of the old drive.
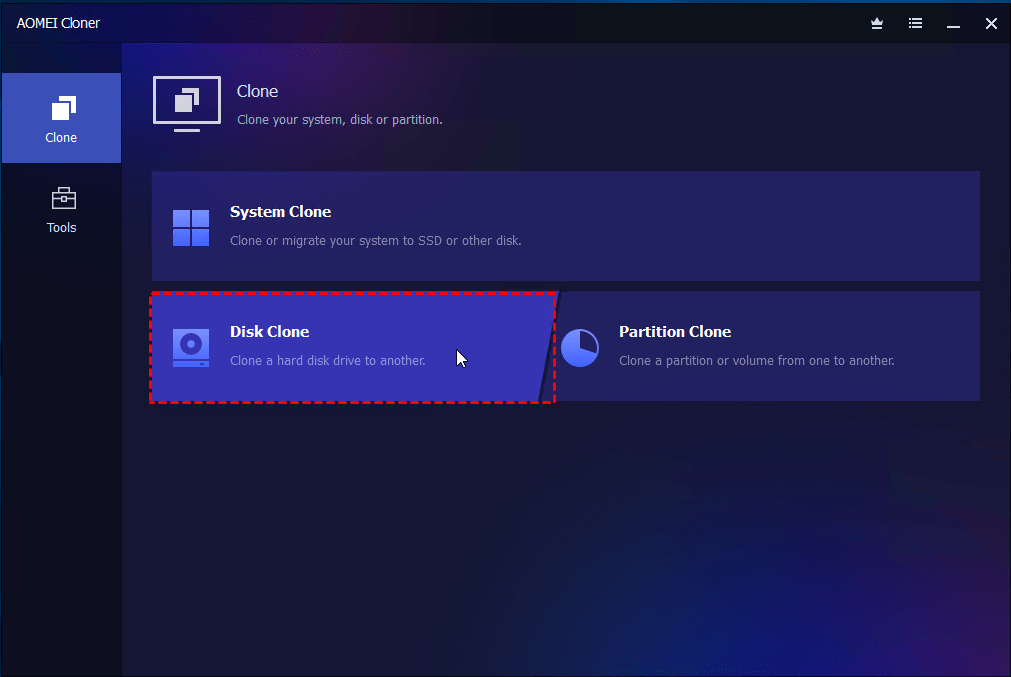
How to clone your HDD to larger HDD/SSD using AOMEI Cloner:
Step 1. Connect your new drive to your PC via a USB adapter or internally. Download and run AOMEI Cloner.
Step 2. Choose Clone from the left panel and then select Disk Clone.
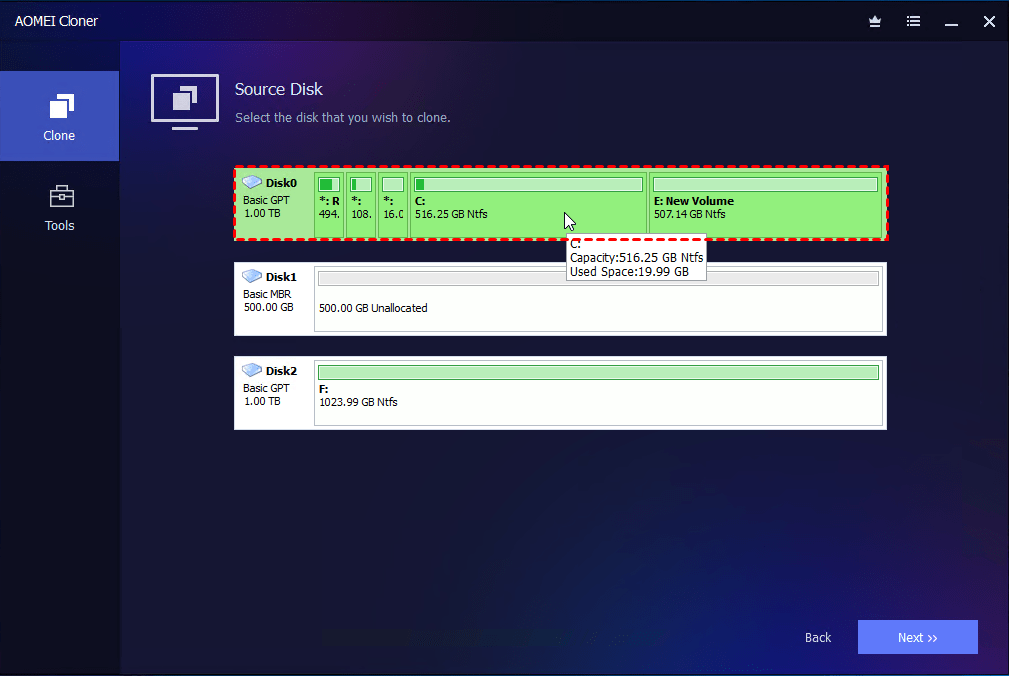
Step 3. Choose your old HDD as the source, and click Next.
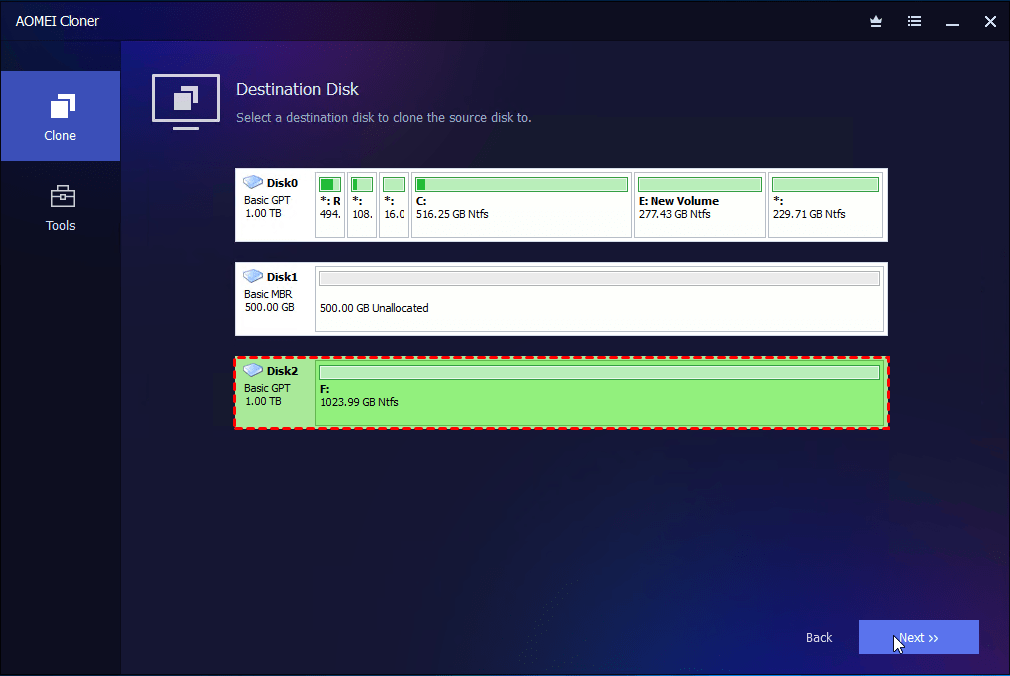
Step 4. Then, select the connected new drive as the target, and click Next.
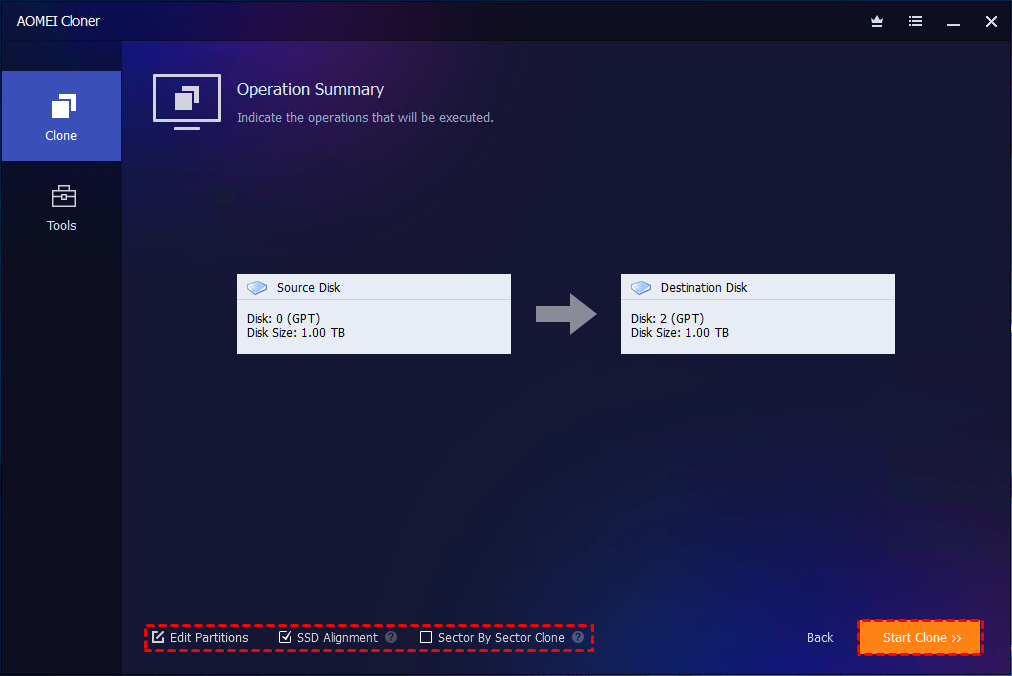
Step 5. Check SSD Alignment if you are cloning to an SSD. Click Start Clone to begin the process.
When the disk cloning is complete, shut down your PC, and replace your old HDD with the new one. Then, boot up your computer from the cloned drive to completely get rid of high disk usage on Windows 11/10.
Conclusion
That’s all about how to fix HDD usage 100 percent in Windows 11. If you don't know the exact cause of the problem, then you may need to try each of the methods listed above. If you are indeed running low on hard disk space, you could try AOMEI Cloner, which helps you copy boot drive to new drive seamlessly with no need to reinstall Windows.
Besides, this software is capable of cloning external hard drives, USB drives, SD cards, and so on. Get it now and enjoy a risk-free disk replacement now.