How to Install Windows 11 on an External SSD (2 Methods)
Want a portable version of Windows 11? This guide shows you how to install Windows 11 on an external SSD using two effective methods. Scroll down to learn more.
Last Updated April 22, 2025
Can I install Windows 11 on external SSD?
Running Windows 11 from an external SSD enables you to carry your OS, apps, and files anywhere and it’s perfect for testing Windows 11 on a Mac, Linux system, or a second PC without wiping or dual-booting.
You may wonder, “Can I install Windows 11 on external SSD?” The answer is Yes. In fact, with the discontinuation of Windows To Go, the feature once meant for running Windows from a USB drive, you're now left with third-party tools and workarounds to get the job done.
How to install Windows 11 on external SSD
If you're ready to run Windows 11 from an external SSD, there are two solid ways to make it happen. You can choose to clone the existing OS or create a bootable portable OS according to your situation.
Note: Whichever method you choose, the target SSD will be overwritten. Back up any important data before proceeding.
Method 1: Using professional OS cloning software
If you already have Windows 11 installed on your internal drive and just want to mirror that setup onto an external SSD, AOMEI Cloner makes it dead simple.
- Disk Clone: Copies an entire hard drive (including OS, apps, and files) to another disk. Supports cloning HDD to SSD, SSD to SSD, or HDD to HDD.
- System Clone: Migrates only the Windows OS and boot partitions, ideal for moving to a smaller SSD.
- Partition Clone: Copies individual partitions to another disk, useful for transferring data without cloning the entire disk.
- Intelligent vs. Sector-by-Sector Clone: Intelligent Clone copies only used data (faster) while Sector-by-Sector Clone duplicates every sector (slower, for exact replication).
- SSD Alignment: Ensures maximum SSD performance by aligning partitions correctly.
Download AOMEI Cloner and follow the instructions below to clone Windows 11 to an external SSD:
1. Connect your external SSD via USB 3.0 or USB-C.
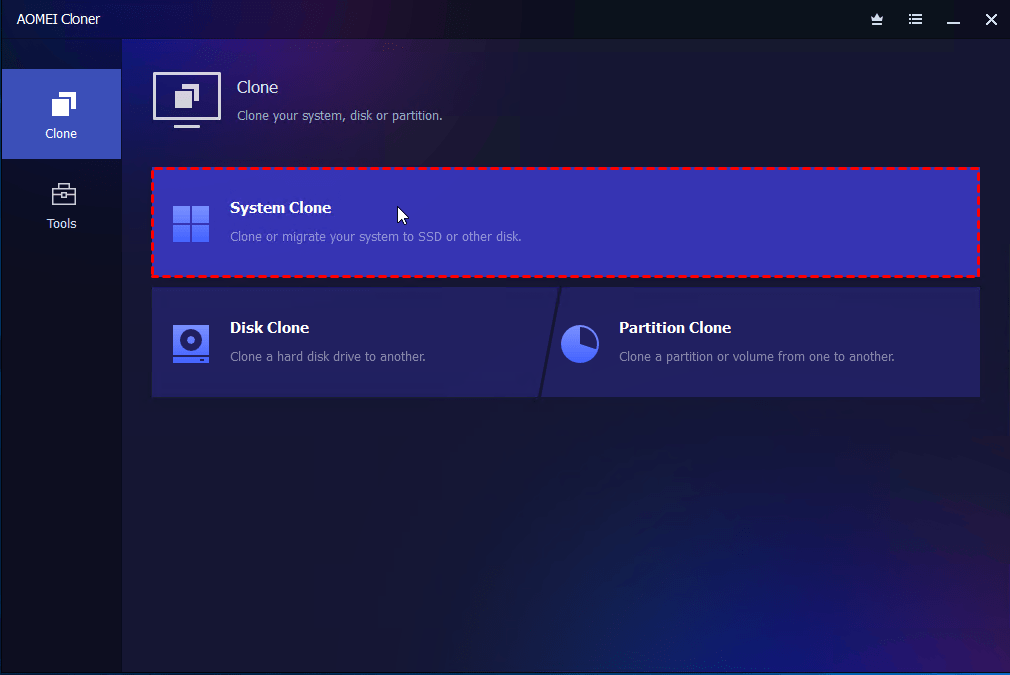
2. Install and open AOMEI Cloner on your Windows 11 PC. Then go to Clone > System Clone.
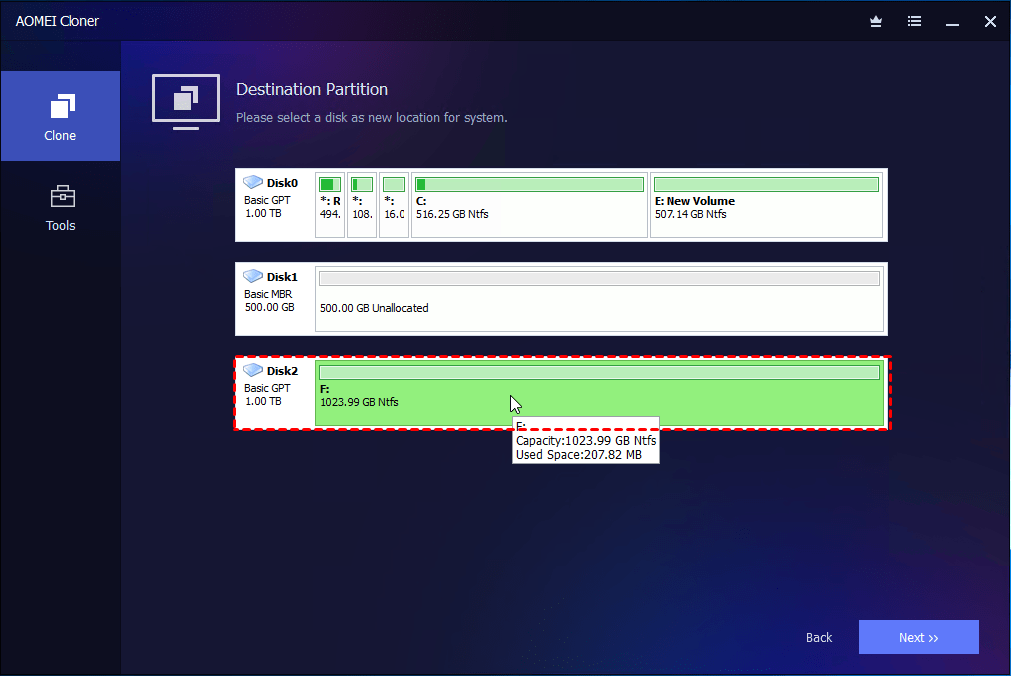
3. Your current Windows 11 system partition(s) is (are) auto-detected. Choose your external SSD as the destination drive.
4. Enable SSD Alignment for better performance. Then click Start Clone and wait for the process to finish.
5. Once done, reboot your PC and access BIOS to boot from the external SSD.
Method 2: Using Rufus
If you want a fresh, portable installation of Windows 11 that you can boot on different PCs, Rufus is the way to go. This method sets up Windows 11 like a plug-and-play OS on your external SSD. Follow the guidance below:
1. Plug in your external SSD. Then download Rufus and open it.
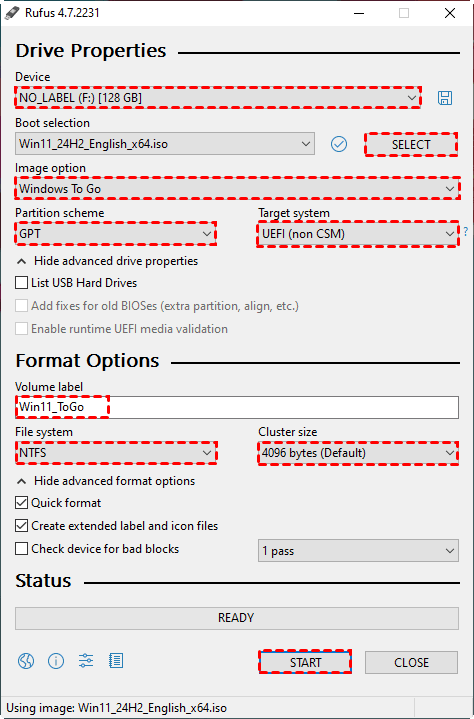
2. Under Device, choose your SSD. (It can be selected automatically.)
3. For Boot selection, choose your Windows 11 ISO.
4. Under Image option, choose Windows To Go (this enables portable installation).
5. Choose Partition scheme and Target system based on your need.
- For modern UEFI systems, choose GPT and UEFI (non-CSM).
- For older BIOS/Legacy systems, choose MBR and BIOS or UEFI.
6. Rufus will auto-set File system and Cluster size for you. You can rename the SSD under Volume label (e.g., "Win11_ToGo").
7. Click START and confirm any warnings. Wait for Rufus to complete.
8. Once completed, reboot your PC and access BIOS to boot from the external SSD.
Bonus: Boosting performance on external SSD
Running Windows from an external drive will always be slower than an internal drive—but there are ways to make it faster and smoother:
1. Use USB 3.1 Gen 2 or USB-C
USB 2.0 is a no-go. Even USB 3.0 can feel sluggish with system-level I/O. A USB-C SSD enclosure with UASP support gives you the best transfer rates.
2. Enable Write Caching
- Go to Device Manager > Disk Drives.
- Right-click on the external SSD and select Properties.
- Go to the Policies tab, select Better performance, check Enable write caching on the device, and click OK.
⚠️ Don’t remove the SSD without using Safely Remove Hardware, or you risk data loss.
3. Disable Background Services
- Disable unnecessary startup apps and services using Task Manager > Startup tab.
- Search for MSConfig in the search box to disable non-essential services during boot.
4. Turn Off Search Indexing
Right-click your external SSD in File Explorer > Properties > uncheck "Allow files on this drive to have contents indexed…". This reduces constant read/write cycles that can slow things down.
5. Optimize for Performance Mode
Go to Control Panel > Power Options and select High Performance or Ultimate Performance (if available).
To sum up
To create a portable OS, test environments, or run Windows without touching your internal drive, you may install Windows 11 on an external SSD. While Microsoft doesn’t officially support it, tools like AOMEI Cloner (for system cloning) and Rufus (for Windows To Go installations) make the process straightforward. With the right setup and performance tweaks, you can enjoy a smooth Windows 11 experience—right from your pocket.