In the dynamic landscape of business operations, safeguarding critical data is non-negotiable. This article delves into the significance of data backup for businesses and introduces Synology's Active Backup for Business, a powerful solution designed to empower comprehensive data protection.
Features and Capabilities
▸Highlighting Key Features
Active Backup for Business comes packed with features such as real-time backup, flexible recovery options, and versioning. Explore how these features contribute to a robust data protection strategy.
▸Role in Comprehensive Data Protection
Understand the pivotal role Active Backup for Business plays in providing businesses with a holistic approach to data protection, ensuring the integrity and availability of crucial information.
Integration with Synology NAS
▸Seamless Integration Process
Learn about the seamless integration process of Active Backup for Business with Synology NAS. Explore how businesses can leverage the synergies between the software and hardware for optimal performance.
▸Advantages of Synology Hardware
Highlight the advantages of using Active Backup for Business in conjunction with Synology hardware, including compatibility, optimized performance, and centralized management.
Benefits for Business Operations
◉ Improved Data Recovery and Business Continuity: Discover how Active Backup for Business enhances data recovery processes, contributing to improved business continuity and minimizing downtime in the event of data loss.
◉ Time and Cost Efficiency with Centralized Management: Explore the time and cost efficiency achieved through centralized management of backups. Learn how businesses can streamline their data protection processes with Active Backup for Business.
How to Set Up Active Backup for Business
Ensuring the protection and availability of critical business data is paramount in today's digital landscape. Synology's Active Backup for Business provides a comprehensive solution for businesses seeking robust data management. Follow this step-by-step guide to set up Active Backup for Business seamlessly using Synology DSM (DiskStation Manager).
1. Log in to Synology DSM:
- Open your web browser and enter the IP address or hostname of your Synology NAS.
- Log in using your administrator credentials.
2. Navigate to "Package Center":
- In the DSM interface, locate and click on "Package Center" in the main menu.
3. Search and Install "Active Backup for Business":
- Use the search bar to find "Active Backup for Business."
- Click "Install" to add the package to your Synology NAS.
4. Open "Active Backup for Business" from the Main Menu:
- Return to the DSM main menu and select "Active Backup for Business."
5. Set Up a New Backup Task:
- Click on "Backup" to initiate a new backup task.
- Choose the type of backup task you want to create based on your business needs.
6. Configure Backup Settings:
- Define the source data by selecting specific folders, files, or entire systems.
- Choose the destination for your backup, whether it's another Synology NAS, a remote server, or cloud storage.
7. Define Backup Schedule:
- Set up a backup schedule according to your business requirements. Options include daily, weekly, or custom schedules.
8. Configure Advanced Settings:
- Explore advanced settings such as versioning, retention policies, and encryption.
- Customize settings based on your data protection and security preferences.
9. Review and Apply:
- Double-check your configured settings to ensure accuracy.
- Click "Apply" to save and activate the Active Backup for Business task.
10. Monitor Backup Progress:
- Return to the "Active Backup for Business" interface to monitor the progress and status of your configured backup task.
- Regularly check logs and notifications for updates or warnings related to the backup process.
By following these steps, you've successfully set up Active Backup for Business on your Synology NAS. This powerful solution ensures the security, accessibility, and efficient management of your business data. Regularly review and update your settings to adapt to changing data needs, ensuring the ongoing resilience and reliability of your critical information.
Regular Windows Backup Guide with AOMEI Cyber Backup
In today's digital age, ensuring the safety of our data is paramount. With the increasing risk of data loss due to system failures, malware attacks, or hardware issues, it's essential to have robust backup strategies in place.
AOMEI Cyber Backup is a comprehensive backup software designed to safeguard Windows systems and data. It offers a range of features including system backup, disk backup, file backup, and more. With its user-friendly interface and flexible options, AOMEI Cyber Backup provides you with an intuitive way to manage your backup tasks efficiently.
◆ Protection against data loss: In the event of system failures or data corruption, you can restore your system and files from a backup.
◆ Peace of mind: Knowing that your data is backed up regularly provides peace of mind and reduces the risk of data loss.
◆ Simplified recovery process: With AOMEI Cyber Backup, restoring your system and files from backup is a straightforward process, minimizing downtime.
Download FreewareWindows Server & PC
* Both free and paid version of AOMEI Cyber Backup support Windows Server 2016/2019/2022/11,10,8,7.
Step-by-Step guide to performing Windows backup
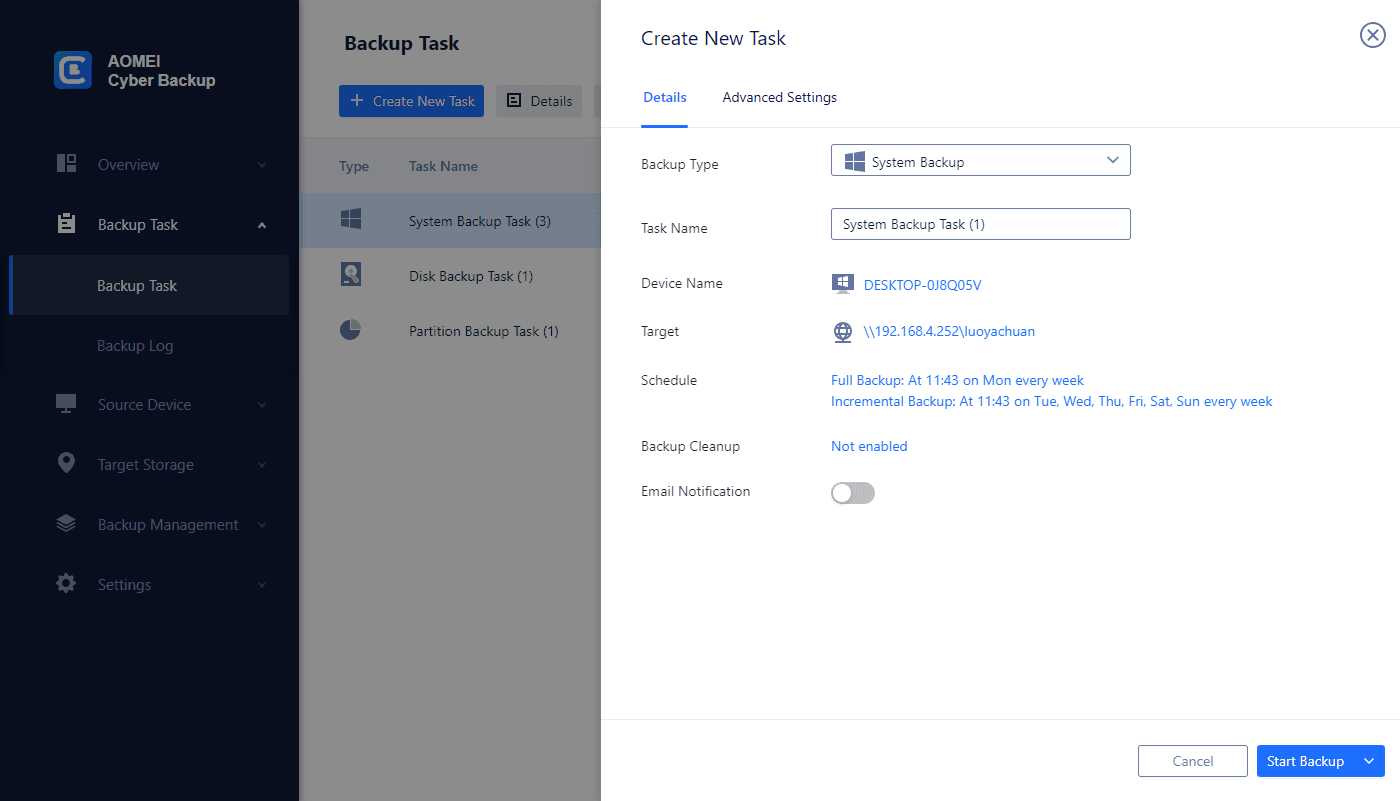
1. Install AOMEI Cyber Backup: Begin by downloading and installing AOMEI Cyber Backup and AOMEI Cyber Backup Agent on your Windows computer.
2. Launch the Application: Open AOMEI Cyber Backup and navigate to Source Device >> Windows. It will automatically appear if the device is compatible and online.
3. Select Backup Type: Choose the type of backup you wish to perform, such as System backup or Disk backup.
4. Choose Backup Source: Select the disks or partitions you want to back up.
5. Select Backup Destination: Choose where you want to store the backup, such as a local path or network location.
6. Configure Backup Settings: Customize the backup settings according to your preferences, including scheduling automatic backups and enabling backup cleanup.
7. Start Backup: Initiate the backup process and monitor its progress. Once complete, verify the backup to ensure all data has been successfully backed up.
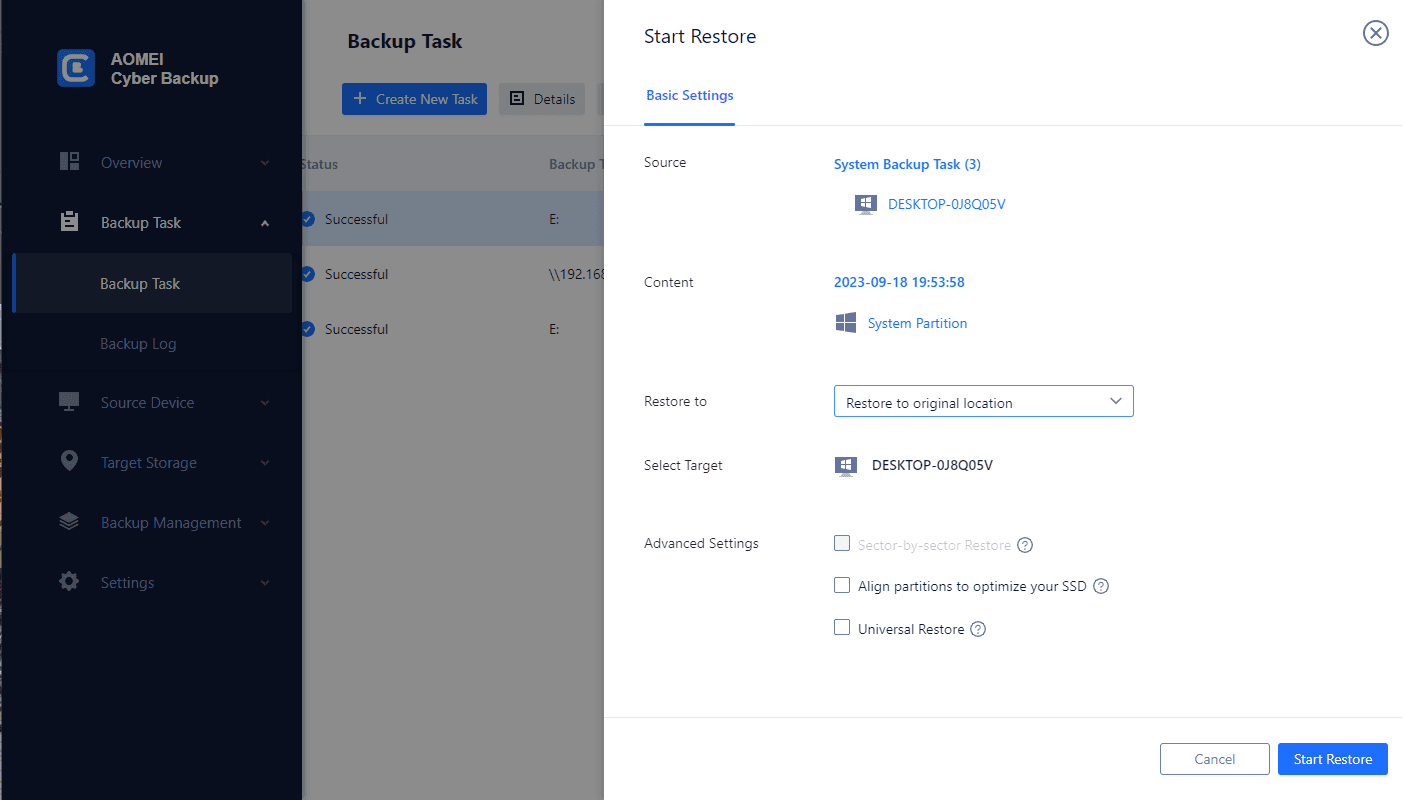
8. Start Restore: From the created backup tasks, locate the backup task you want to restore and click … >> Restore. Choose to Restore to original location to create the same data directly from the backup.
Conclusion
In conclusion, Active Backup for Business by Synology emerges as a pivotal solution for businesses seeking comprehensive data protection. By understanding its features, benefits, and setup procedures, businesses can optimize their backup strategies, ensure compliance, and empower their operations with efficient and secure data management. Embrace the power of Active Backup for Business to safeguard your business data in today's dynamic digital landscape.


