By
Crystal
![]() / Last
Updated March 19, 2026
/ Last
Updated March 19, 2026
Overview of Amazon EC2 Backup
AWS Backup makes it easy and cost-effective to protect your data across AWS services. It's a fully managed service with policies that simplify data protection at scale. With a few clicks in the console, create backup plans to automate schedules and manage how long backups are retained. Apply these plans to your AWS resources by tagging them, and AWS Backup takes care of the rest, automatically backing up your data.
Whether you need on-demand backups or want to customize plans for specific resources like Amazon EC2 instances, AWS Backup has you covered. It centralizes compliance, enhances security, and provides enterprise-level features. When you back up an EC2 instance, AWS Backup protects all attached Amazon EBS volumes, preserving them in an AMI with all the original parameters.
Prerequisites
Before starting this tutorial, make sure you have:
- An AWS account. Refer to AWS Backup documentation for first-time setup details.
- One or more Amazon EC2 instances. Check the Amazon EC2 pricing page for information, and find AWS Backup pricing on its pricing page.
- AWS Backup relies on IAM roles to create EC2 instance backups. If you haven't created a specific role, you can use the default role (AWSBackupDefaultRole).
How to Backup AWS EC2 Instances [3 Methods]
There are 3 methods for AWS EC2 backup.
- Taking EBS Snapshots
- Creating a new AMI
- Automating AWS EC2 backup
Method 1. Elastic Block Store (EBS) Snapshots
EBS snapshots are a fundamental component of AWS EC2 instance backup. These point-in-time copies of your EBS volumes enable you to create a baseline for recovery. By scheduling regular snapshots, you can capture your instance's state and recover it to any specific point in time.
1. Open the AWS console, then select Services and click EC2.
2. Select Running Instances and choose the instance you would like to back up.
3. In the Description tab, find the Root device section and select the /dev/sda1 link.
4. In the pop-up window, find the volume’s strong>EBS ID name and click it.

5. Under Volumes section, click Actions and select Create Snapshot.
6. Open the Create Snapshot box, add a description for distinction, assign tags for monitoring, and click "Create Snapshot."
After creating the snapshot, find it in the Snapshots section on the left. You've successfully made a copy of the EBS volume, useful for restoring your EC2 instance later on.
Method 2. Amazon Machine Images (AMIs)
AMIs provide a more comprehensive backup solution by capturing not only the EBS volume but the entire instance configuration. This allows for the recreation of the entire EC2 instance, including the operating system and installed applications. AMIs are particularly useful for creating standardized, reproducible environments.
📢 Note: To create an AMI you would need to stop your Amazon EC2 in most cases.
1. Sign in to your AWS account to open the AWS console.
2. Select Services in the top bar and click EC2 to launch the EC2 Management Console
3. Select Running Instances and choose the instance you want to back up.
4. Click Actions > Image > Create Image.
5. Open the Create Image menu to name your image, add a description, and configure instance volumes. Creating an EBS image automatically generates snapshots for each volume, accessible in the Snapshots section. Then click Create Image.
Method 3. Automating AWS EC2 Backup
Next, you will learn how to create a backup of an Amazon EC2 instance.
1. Select Services in the top bar and then type AWS Backup in the search bar. Click Backup plans in the left pane.
2. Press the Create Backup plan button
3. Click Info for more details. Since there are no existing backup plans, create a new one from scratch by entering a name and proceeding.
4. Under Backup rule configuration section, specify the backup rule name and schedule the backup frequency, backup window, backup lifecycle, etc.
5. In this step, choose the backup vault for storing the recovery points created by this Backup rule. Click "Create new Backup vault" for a new customizable vault, use an existing Backup vault if available, or opt for the default AWS Backup vault.
6. Add tags to both recovery points and your backup plan. This ensures organized management and allows for easy monitoring of their current status.
7. Your backup plan is now created successfully. To activate and use it in your system, you must assign resources that require backup. Click the "Assign resources" button located in the top bar.
- Provide a resource assignment name.
- Select the default role or choose another IAM role.
- Define resource selection
- Select Resource type and the name of the resource.
- Choose the Resource selection button to assign the resources to the backup plan.
How to Create AWS Backup for Your Devices Easily
Your important data will be safe and readily available whenever you need it if you back it up to a secure cloud service like Amazon S3. When used with Amazon S3, AOMEI Cyber Backup offers a strong, effective, and safe way to backup your important data. Utilizing the advantages of Amazon S3 and AOMEI Cyber Backup, you can be sure that your data is quickly recoverable, safeguarded against loss, and kept in a highly reliable and scalable cloud environment. With its sophisticated features and user-friendly interface, it makes data backup easier. Some of its helpful features include:
- Automated Backup: To guarantee ongoing data safety, schedule frequent backups.
- Centralized Management: Utilize a single console to oversee and manage every backup activity.
- Cloud Integration: For offsite backups, cloud storage providers like Amazon S3 are simple to interface with.
- Universal Restore: Restore backups created from one host to another host with different hardware, ensuring flexibility of data recovery and migration process.
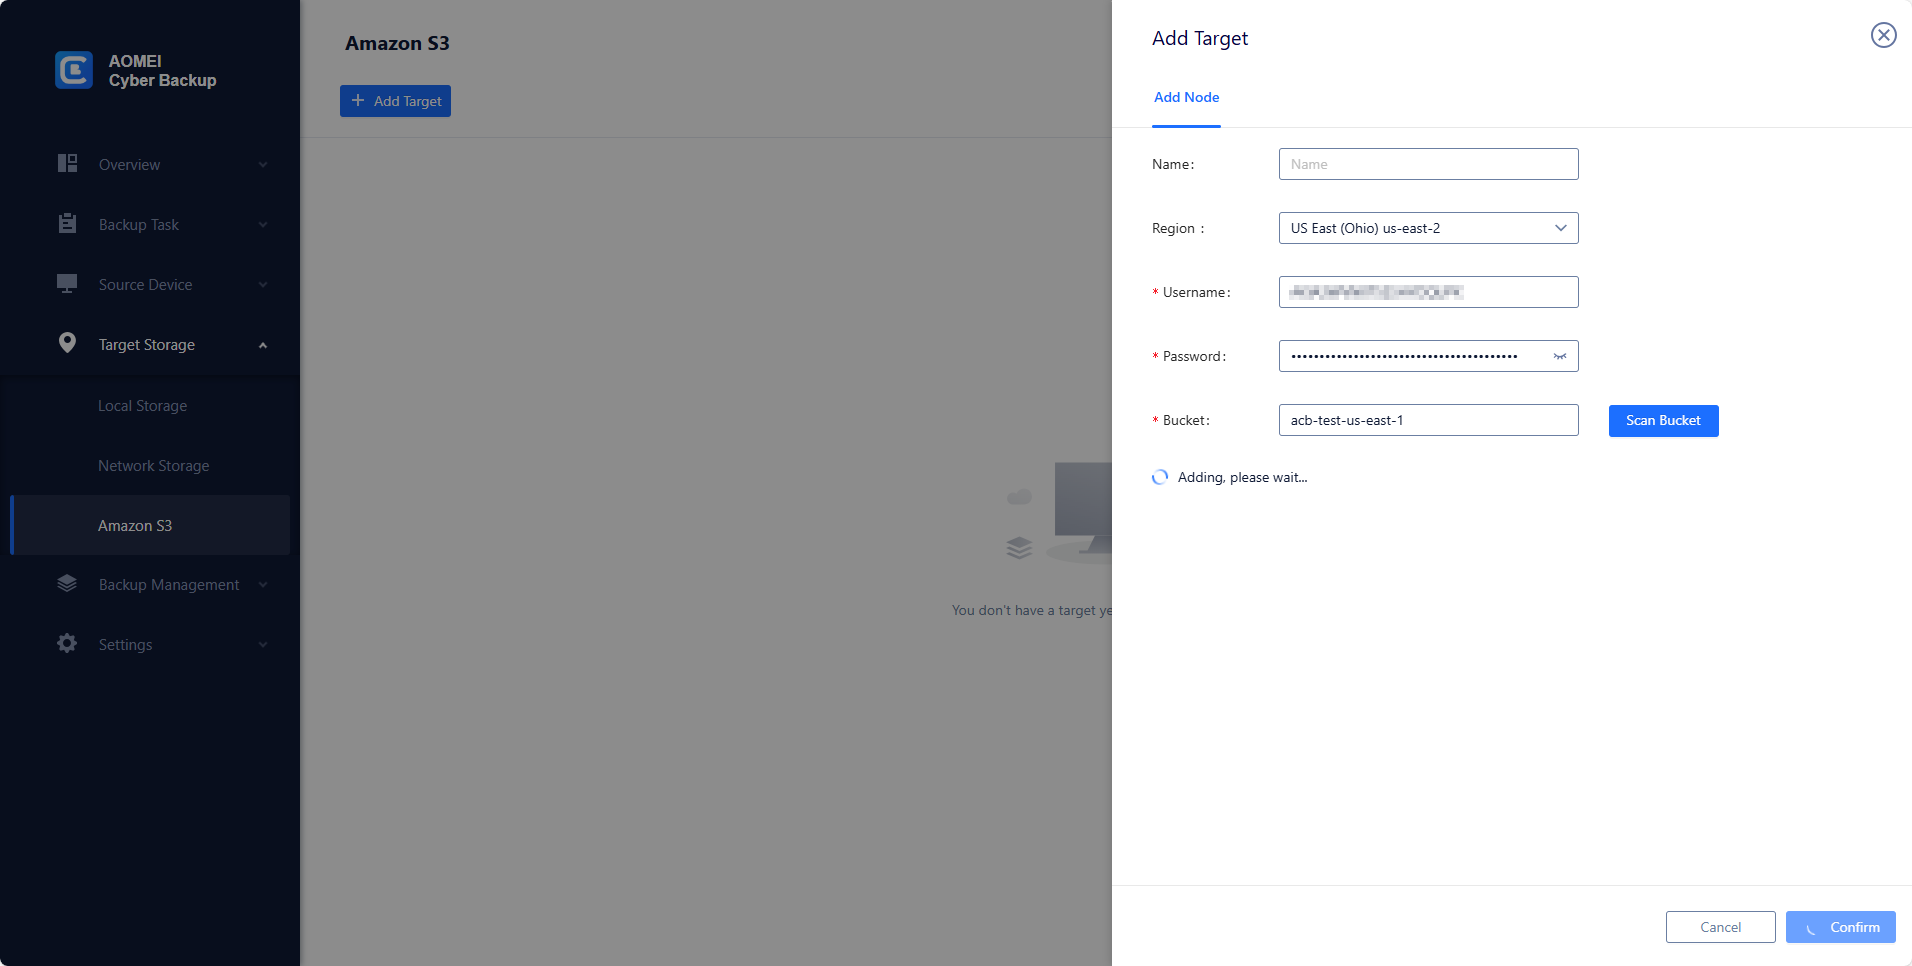
1. Click Target Storage > Amazon S3 > Add Target to open the add target page. Enter your Amazon S3 credentials including username, keyword, and bucket name, then click Confirm. Ensure you have the necessary permissions set up in your AWS account.
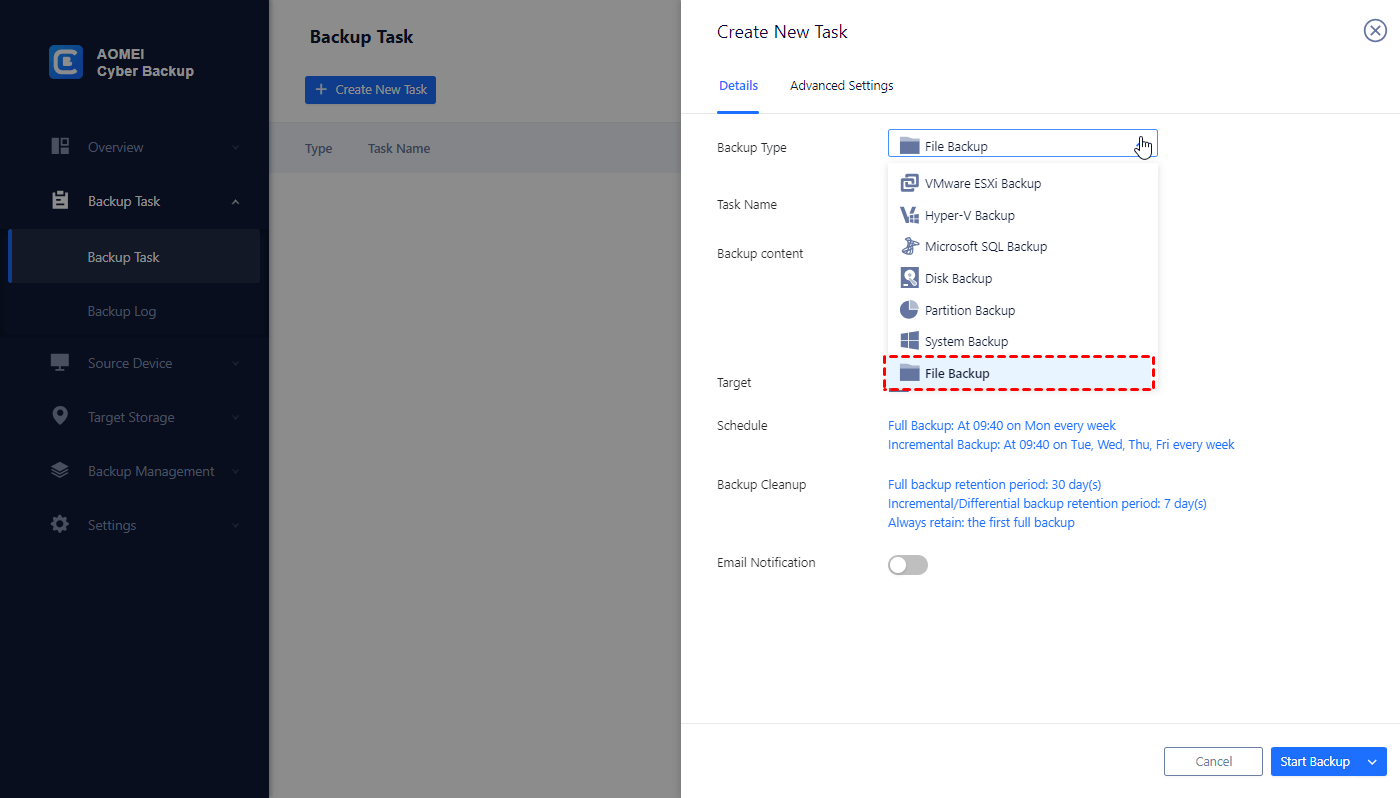
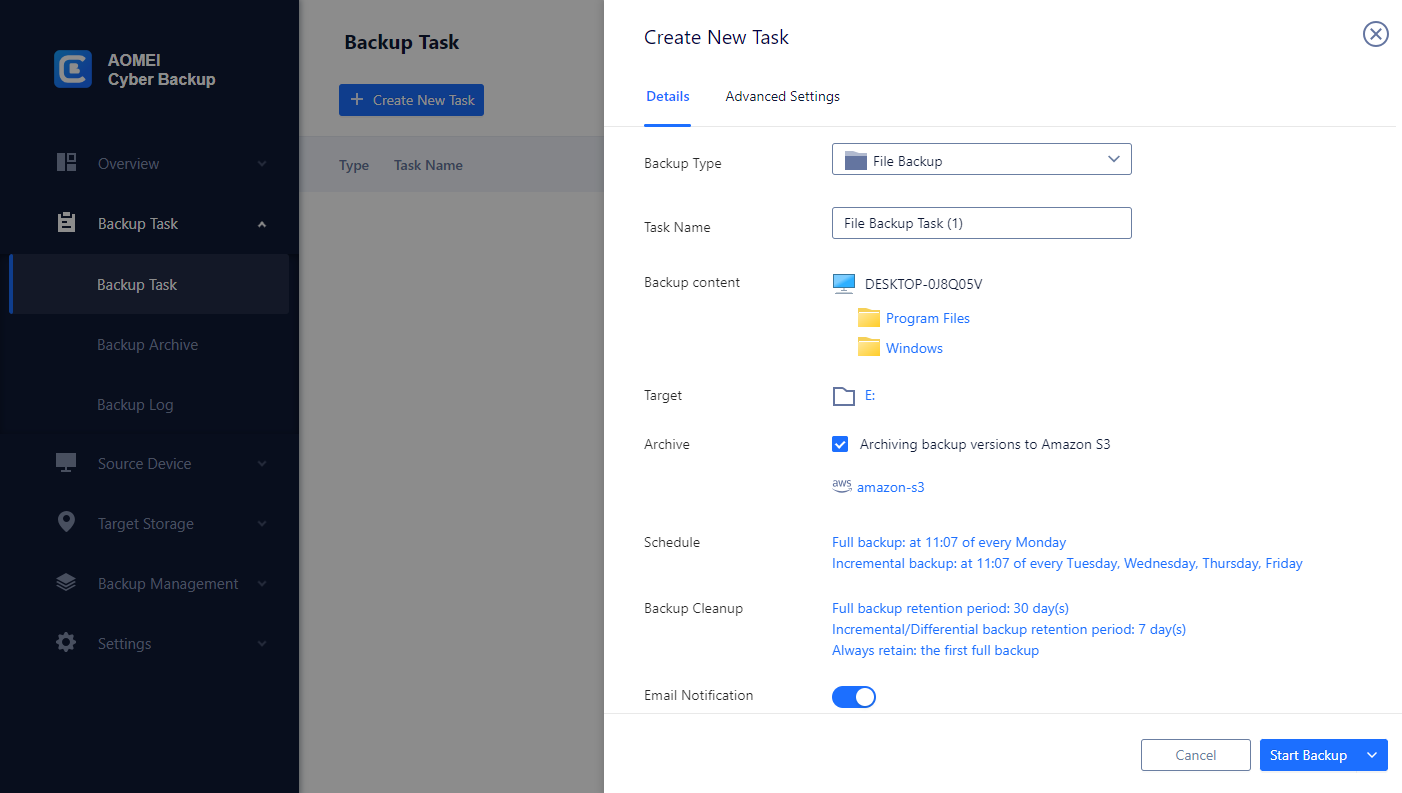
2. Click Backup Task > Create New Task to starting archiving your important data to Amazon S3. Select File Backup (for example) and choose files or folders for backup.
3. Check Archiving backup versions to Amazon S3 and click Select to choose the added Amazon S3.
4. Schedule backup task to run daily/weekly/monthly, and select backup retention policies to delete old backups automatically.
5. Click "Start Backup" to begin the backup process. It will first create a backup locally or on the NAS and then upload the backup to Amazon S3.
Conclusion
AWS EC2 instance backups protect your valuable data and ensuring that you can recover swiftly from any setbacks. This article offers 3 methods about AWS creating backup of EC2 instance such as taking EBS snapshots, creating a new AMI and automating AWS EC2 backup.
Best Enterprise Backup Solution

- VMware and Hyper-V Backup
- SQL Server/Workstation Backup
- Scheduled Automatic Backup
- Flexible Backup Cleanup Policy
- Backup and Manage Centrally


Still Need Help?
Have your problem been solved? If not, please input query in the search box below.