The Necessity of Physical Server Backups
Physical servers remain the backbone of many businesses, hosting critical applications, databases, and sensitive information. Numerous enterprises rely on physical servers due to their robustness, performance, and control over hardware resources. However, with the reliance on physical servers comes the inherent risk of data loss, hardware failures, natural disasters, and unforeseen incidents that can severely disrupt business operations.
To mitigate these risks and ensure uninterrupted access to valuable data, the significance of backing up physical servers cannot be overstated. This post will introduce 3 professional ways to back up your physical servers, safeguarding your valuable data.
Way 1. Free Backup Physical Server with AOMEI Cyber Backup
Way 2. Backup Physical Server via AOMEI Backupper Server
Way 3. Windows Physical Server Backup via Windows Server Backup (Built-in)
Types of Backup Solutions for Physical Servers
To protect critical data on physical servers, there are several backup server solutions available. In this article, we will look at the three primary backup solutions for physical servers:
- Windows Server Backup to Tape
- Disk Imaging and Cloning
- Cloud-Based Backup Solutions
Type 1. Traditional Tape Backup
Traditional tape backup uses of magnetic tape storage media to create backup copies of server data. In this method, data is written sequentially to the tape, providing a cost-effective and easily portable solution for data storage.
Advantages:
✔ Cost-effectiveness: Tapes offer a low-cost option for archiving large amounts of data.
✔ Offline storage: Tapes can be stored offline, protecting data from online threats like cyberattacks.
✔ Durability: Tapes have a long shelf life and can withstand harsh environmental conditions.
Type 2. Disk Imaging and Cloning
Disk imaging and cloning involve creating exact replicas of the entire server's hard drive or a specific partition. This method captures the server's operating system, applications, configurations, and data in a single image file, simplifying the restoration process.
Advantages:
✔ Rapid recovery: Disk imaging allows for quick restoration of the entire system in case of failure.
✔ Simplified setup: Cloning enables easy deployment of identical server configurations.
✔ Data migration: Cloning is useful when transitioning to new hardware or upgrading storage.
Type 3. Cloud-Based Backup Solutions
Cloud-based backup solutions have gained prominence in recent years, leveraging the power of remote servers and the internet to securely store server data offsite. This approach offers flexibility, scalability, and increased data redundancy.
Advantages:
✔ Data accessibility: Cloud backups enable remote access to data from any location with an internet connection.
✔ Scalability: Cloud storage can easily accommodate growing data needs without hardware upgrades.
✔ Automated backups: Many cloud backup services offer automated scheduling for hassle-free backups.
How to Backup Physical Server Easily and Efficiently | 3 Ways
Businesses rely heavily on their physical servers to store critical data and applications. However, ensuring the safety and availability of this data is paramount. In this article, we'll walk you through the process of creating a backup to safeguard your vital information.
Way 1. Free Backup Physical Server with AOMEI Cyber Backup
AOMEI Cyber Backup is an enterprise level backup software, providing automated and centralized physical server backup solutions. And you can enjoy all the backup solutions (virtual machines/MS SQL/partition/file backup...) and features as following to make this task simple and effective.
Bare-Metal Recovery: AOMEI Cyber Backup supports bare-metal recovery, allowing you to restore your entire physical server.
Centralized Management: You can monitor and control all your server backups from a single interface, streamlining the backup process.
Flexible Scheduling: AOMEI Cyber Backup allows you to set flexible backup schedules that suit your business needs, ensuring that your server data is always up-to-date.
Disaster Recovery: AOMEI Cyber Backup facilitates rapid disaster recovery. You can restore your servers to their previous state quickly, minimizing business disruption.
Download AOMEI Cyber Backup here:
✍ Prerequisites to Windows server backup
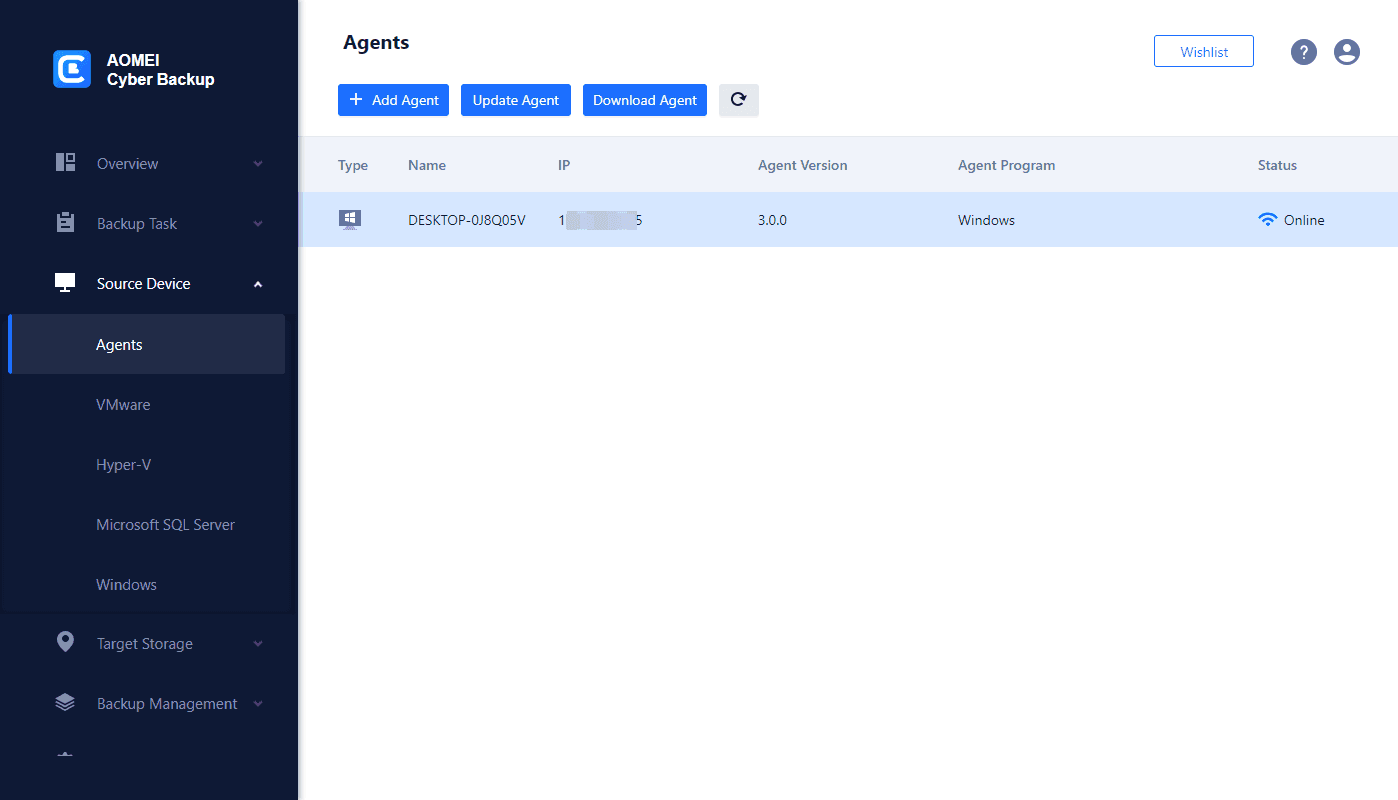
1. Firstly, please navigate to Source Device >> Agents >> + Add Agent. If you do not install AOMEI Cyber Backup Agent to your computer or the version of agent is not compatible, please Download Agent or Update Agent at first.
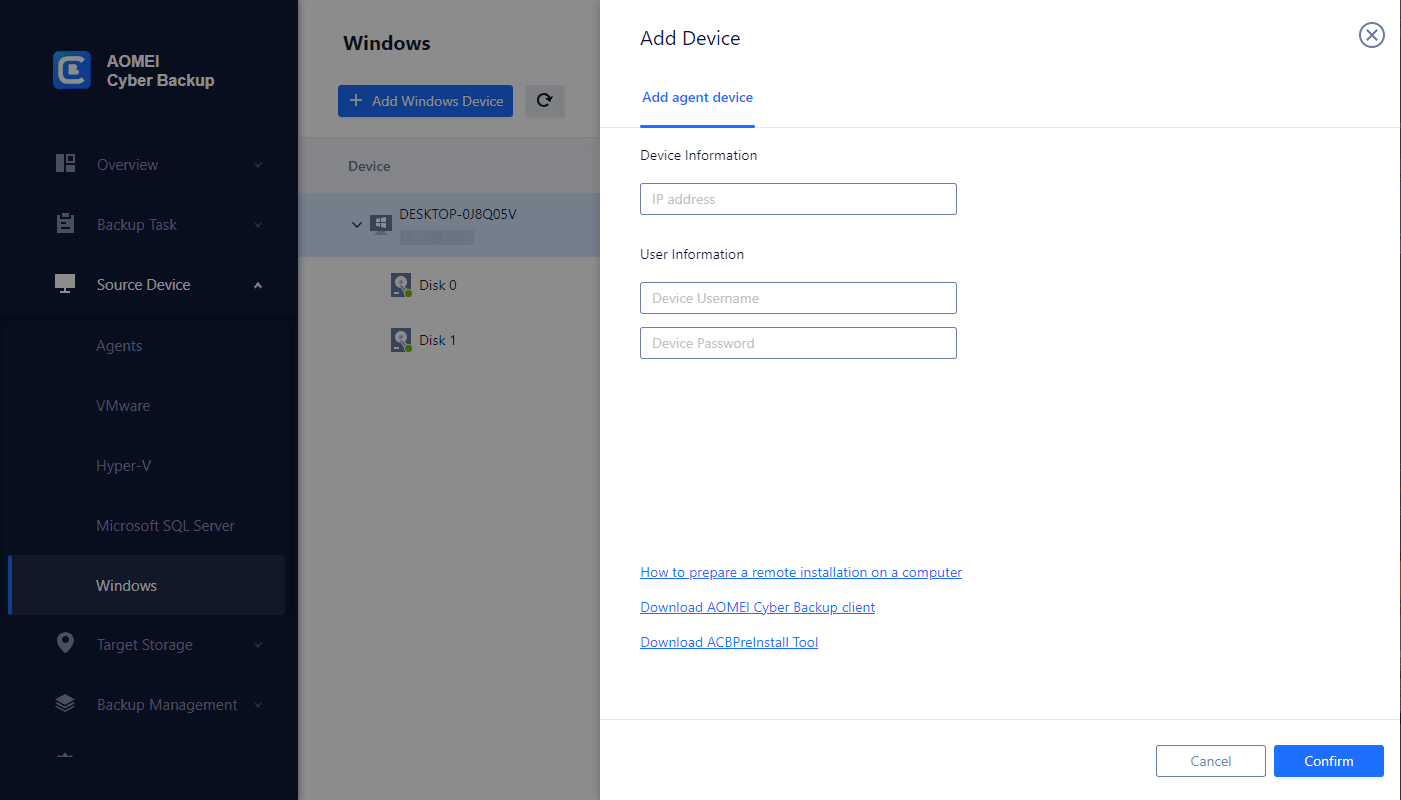
2. Access to Source Device >> Windows. It will automatically appear if the device is compatible and online. Otherwise, you need add Windows device by clicking + Add Windows Device to enter your Device Information and User Information.
✍ Backup and Restore Windows system via AOMEI Cyber Backup
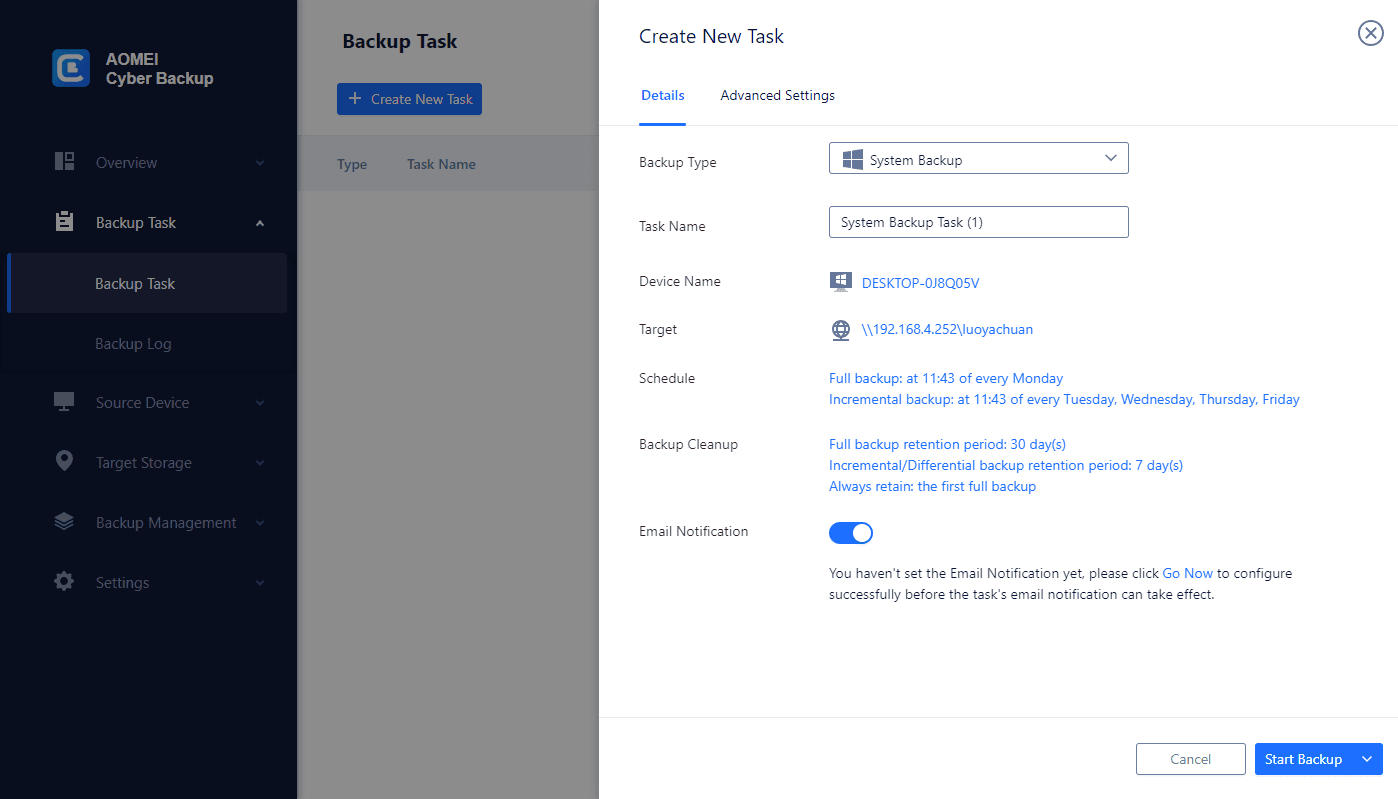
1. Create Backup Task: Click Backup Task >> + Create New Task, and choose backup type as System Backup. Then specify Task Name, Device Name, Target, and Schedule as you want.
- Task Name: Enter a special name for the Windows Server Backup task.
- Device Name: Select your Windows server.
- Target: Select to back up to a new local storage, a new network storage or Amazon S3.
- Schedule: Choose to perform full, differential or incremental backup, and automate execution as daily, weekly or monthly according to the frequency you specified.
- Start Backup: You can select Add the schedule and start backup now, or Add the schedule only.
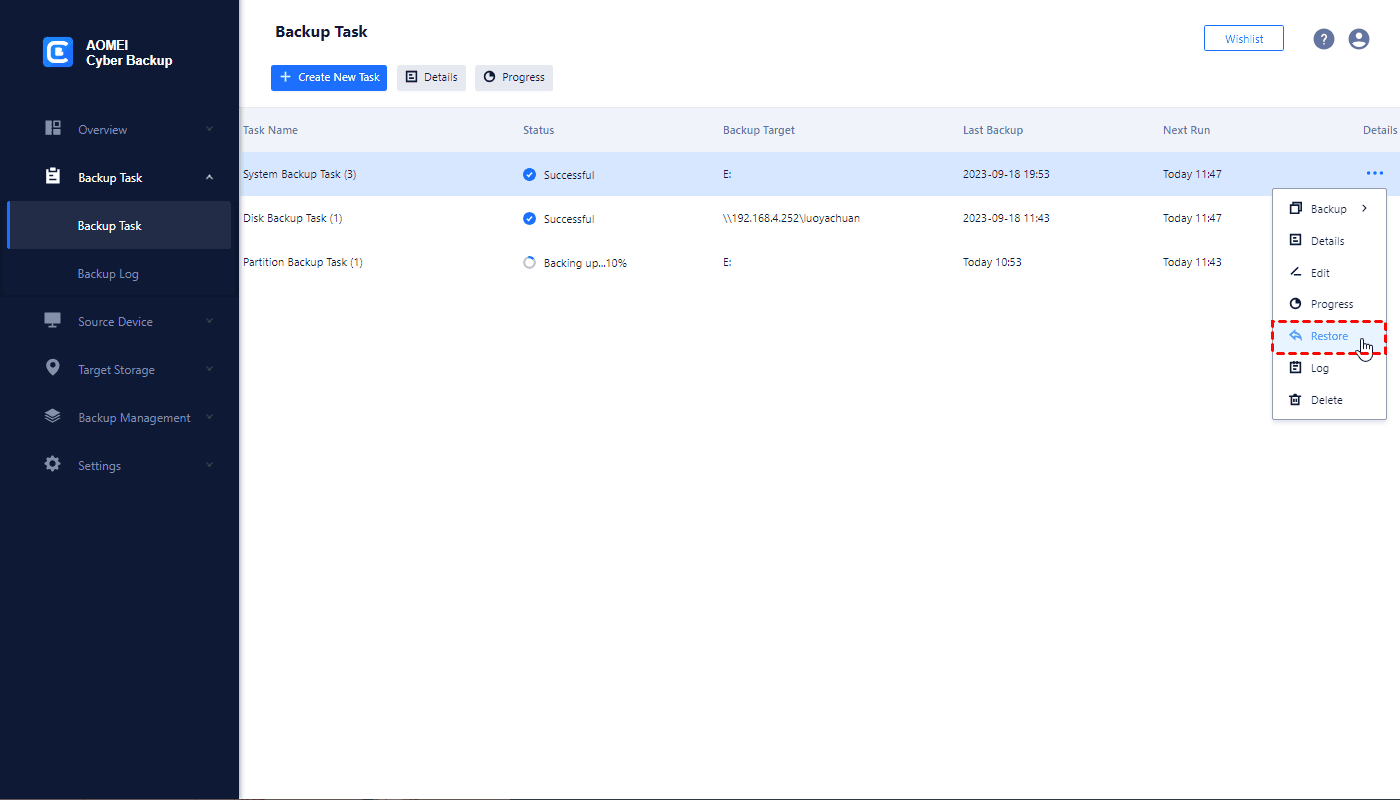
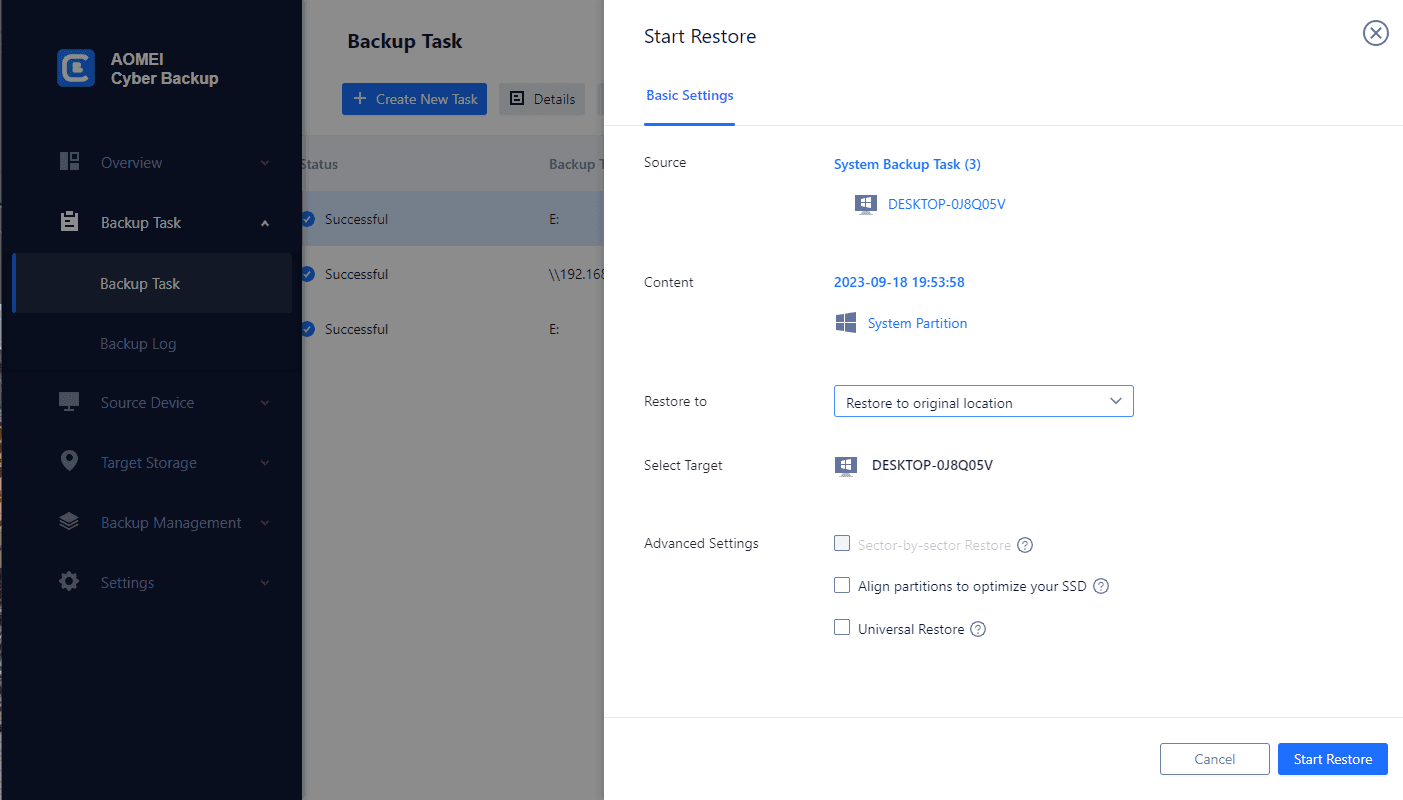
2. Restore from backup: Click … >> Restore on the left of the backup task to start setting up the Windows system recovery task.
- Restore Content: Confirm the restore Source task, and click Select Content to specify a restore point. Then click OK to confirm your choice.
- Restore Location: Specify your target location that you want to restore to. Select Restore to original location to restore your system quickly from any backed-up history version.
- Start Restore: Now you can click Start Restore. The details of the recovering process will be displayed in Restore Records.
☞ While the Free Edition covers most of the Windows Server backup needs, you can also upgrade to Premium Edition to enjoy:
Backup More Windows Server: Protect more Windows Servers at a cost-effective price.
Backup Cleanup: Configure retention policy to auto delete the old backup files and save storage space.
Restore to new location: Restore your servers to a new computer quickly, minimizing business disruption.
By following the simple steps outlined above, you can safeguard your critical server data and ensure business continuity in the face of unforeseen challenges. Don't leave the security of your data to chance—trust AOMEI Cyber Backup for robust physical and virtual server backup solutions.
Way 2. Backup Physical Server via AOMEI Backupper Server
AOMEI Backupper Server edition is designed to assist both home and business users in backing up essential and valuable data. It supports a variety of backup types, enabling you to create backups for files, folders, partitions, or entire systems.
1. Launch AOMEI Backupper, then click Backup > System Backup.
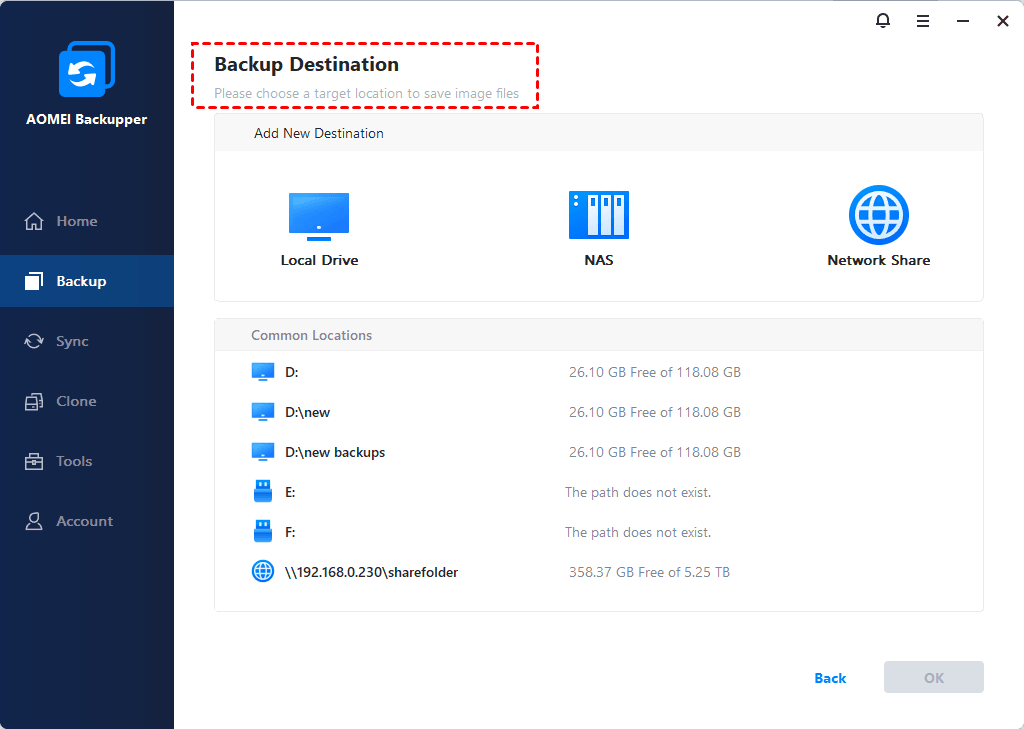
2. Select a backup storage such as an external hard drive or other storage device local drive.
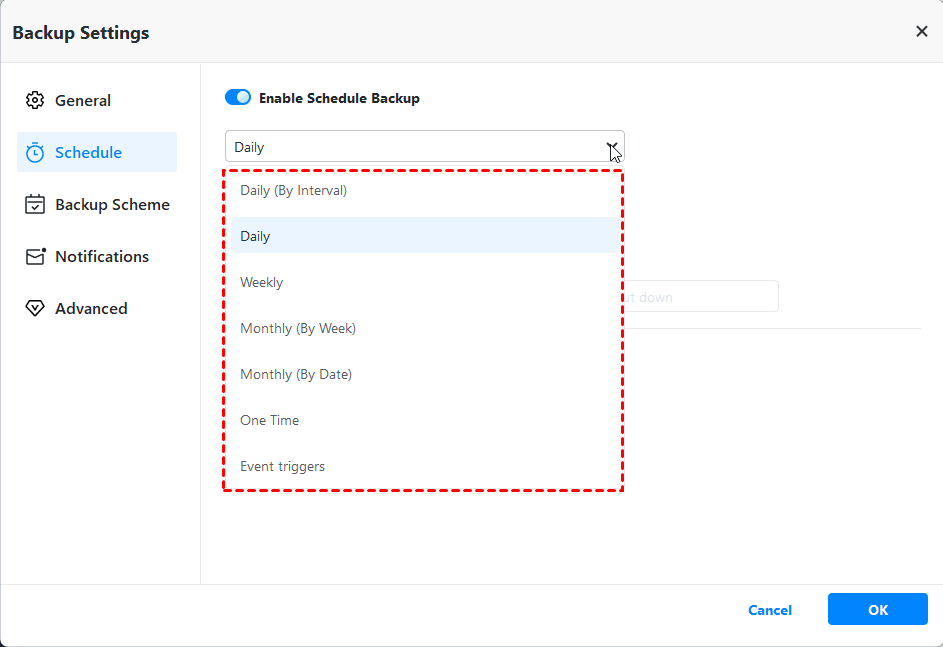
3. Schedule the backup as you like. Besides, you are able to enable email notification, set high compression or customized splitting, etc.
4. Review the setting and click Start Backup.
Way 3. Windows Physical Server Backup via Windows Server Backup (Built-in)
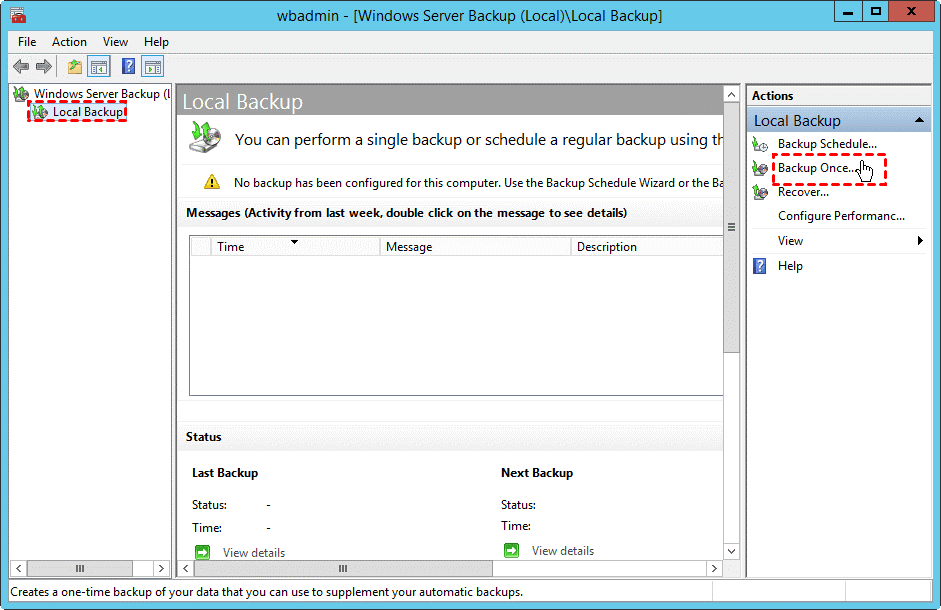
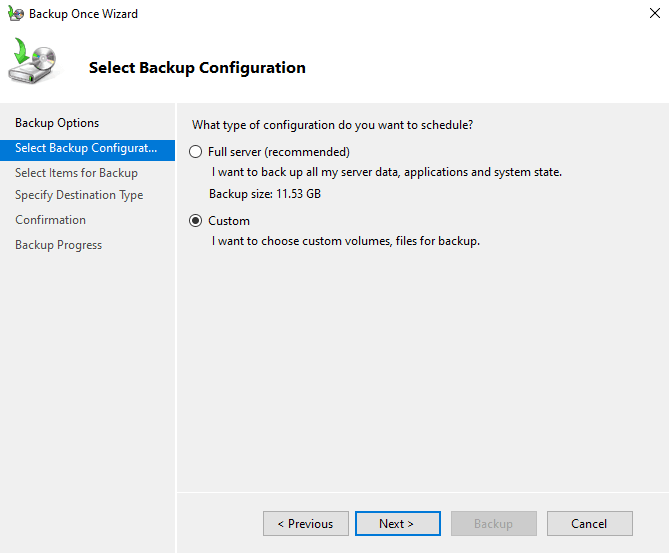
1. On Windows Server, you can use the built-in Windows Server Backup tool to perform backups.
2. Click on Backup Once to perform a one-time backup or Backup Schedule to set up a recurring backup.
3. Choose either Full server or Custom to select specific volumes or files for backup.
4. Choose the backup destination. You can backup physical server to an external hard drive, a network location, or a dedicated backup disk.
5. Review the settings of your physical backup to ensure everything is accurate. Then click Backup to start the backup process.
✍ To create Linux Physical Server Backup
Linux distributions often have built-in backup utilities, such as rsync, tar, or dd, which can be used for file-level backups or disk imaging.
• For file-level backup using rsync, create a backup script to specify the source directories and the backup destination.
Example:
#!/bin/bash
rsync -avz /path/to/source /path/to/backup/destination
• For disk imaging using dd, create a command to clone the entire disk to a backup file.
Example:
dd if=/dev/sda of=/path/to/backup/image.img
Differences: Physical Server Backup vs Virtual Server Backup
There are many ways to back up physical servers, and some of the methods can be used to back up virtual machines. However, you may be exposed to serious challenges when backing up your data.
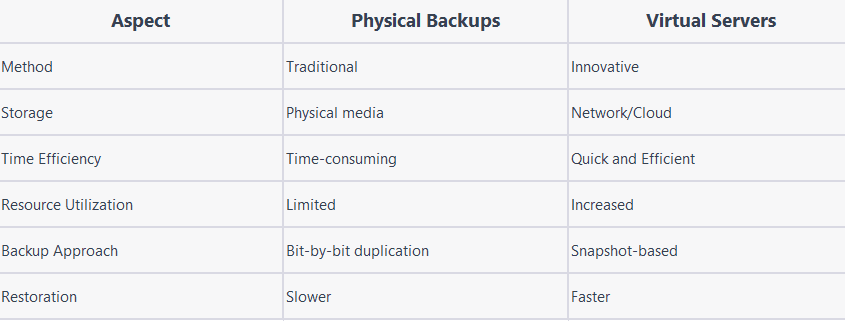
Physical Backups: Physical backups are the traditional approach of creating backups for data and entire systems by copying and storing them on physical storage media like tapes, external hard drives, or other offline devices.
- Traditional method.
- Copies data to physical storage.
- Reliable but time-consuming.
- Manual processes and physical transportation.
Virtual Servers: Virtual servers, on the other hand, allows multiple virtual machines (VMs) to run on a single physical server through the use of virtualization software, such as VMware or Hyper-V.
- Innovative technology.
- Virtual machines (VMs) on one physical server.
- Increased hardware utilization.
- Snapshot-based backups for quick restoration.
- Stored on network/cloud for easy access.
Table of differences between physical server backup and virtual server backup:
Conclusion
Physical backup is an important safeguard against cyber threats, and this article provides three cost-effective solutions for physical server backup. By using specialized tools, organizations can increase resilience, protect valuable data, and ensure business continuity under adverse conditions.

