What is restore point
Restore point is a predefined state in a computer system or software application that serves as a snapshot of the system's configuration, settings, and data at a specific point in time. It functions as a safety net, allowing users to return their system to a previous stable state if issues or errors arise. Restore points are particularly valuable for recovering from software malfunctions, updates, or unintended changes that could lead to system instability or data loss.
In essence, a system restore point Windows Server captures a moment in the system's history when it was functioning optimally, preserving important system files, configurations, and settings. This enables users to roll back their system to that specific state, effectively undoing any subsequent changes that may have caused problems.
What a restore point saves and recovers
Restore point in a computer system captures and saves a snapshot of critical system components, settings, and configurations, enabling you to recover their system to a specific stable state if problems or errors occur. Here's what a restore point saves and subsequently recovers:
- System Files and Configurations: Restore points preserve essential system files, including operating system files, device drivers, and registry settings.
- Software Installations and Updates: When a restore point is created after installing new software or applying updates, it captures the system's configuration at that point.
- Application Settings and Preferences: Restore points also include application settings and preferences that were in place at the time of creation.
- User Data and Files: While restore points primarily focus on system-level components, they don't typically include user data and files.
- System Stability and Performance: A well-functioning restore point contributes to the overall stability and performance of the system.
- Recovery from System Failures: In the event of a system failure, restore points offer a way to recover the system without needing to perform a full reinstallation of the operating system.
Automatic creation of restore point VS. Manual creation of restore point
Automatic and manual creation of restore points represent two distinct approaches to capturing system snapshots in Windows environments. While both methods aim to preserve system stability and facilitate recovery, they differ in their timing, control, and usage scenarios. The following part is to explore the differences between automatic and manual creation of restore points:
- Timing: Automatic restore points are created at regular intervals or in response to specific events, while manual restore points are initiated by users when needed.
- Control: Automatic creation offers convenience and consistency, while manual creation provides users with control and customization.
- Usage Scenarios: Automatic restore points are suitable for ongoing system protection, while manual restore points are preferred before major changes or as specific checkpoints.
- Resource Usage: Automatic creation may use more disk space due to regular snapshots, whereas manual creation offers resource efficiency.
How to create a manual restore point Windows Server
Creating a manual restore point is an act of proactive data stewardship. Here's a step-by-step guide on how to create a restore point Windows Server:
1. Launch the Settings application and navigate to the System section.
2. Within the system page, access the About tab, and then proceed to the adjacent Related Settings section.
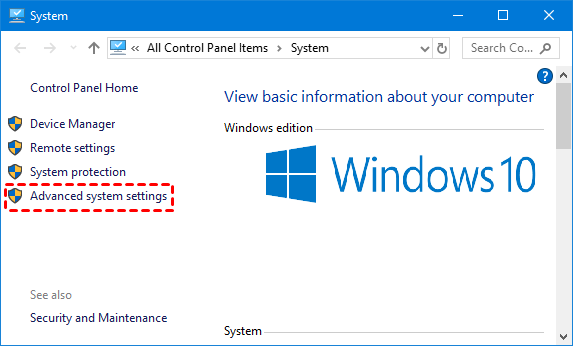
3. Select Advanced System Settings. This action will open the window for System Properties.
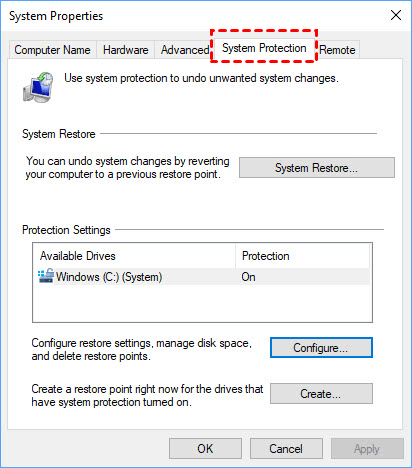
4. Within this interface, locate the System Protection option, encompassing various settings for system restoration.
5. For the creation of a manual system restore point, initiate the process by selecting the designated Create… button, and subsequently assign a descriptive name to denote its purpose. Then click Create.
How to recover with a system restore point Windows Server
When the storm hits and chaos ensues, the path to recovery lies within your grasp. Here's how to recover with a system restore point from Windows Server backup:
1. Launch the Settings application and navigate to the System section.
2. Within the system page, access the About tab, and proceed to the adjacent Related Settings section.
3. Select Advanced System Settings. This action will open the window for System Properties.
4. From there, access the System Protection feature.
5. Click the option marked as System Restore. A window will appear, presenting the choice between utilizing the latest automated restore point or opting for an alternate point in time.
6. Click Next and then click Finish to initiate the restoration process.
One effortless way to restore Windows server from backup easily
Data security and system reliability are paramount in the world of server management. When unexpected disasters strike, the ability to quickly and effectively restore your Windows Server from backup becomes crucial.
While Windows Server's built-in restore points offer a level of protection, comprehensive data and system recovery often require more advanced solutions. AOMEI Cyber Backup is a robust tool that simplifies the process of restoring your Windows Server from backups, providing the following benefits.
◆User-Friendly Interface: With an intuitive and straightforward interface, navigating through the recovery process is hassle-free.
◆Versatile Options: It offers a range of backup options, including System Backup, Disk Backup, Partition Backup, etc.
◆Automated Execution: Schedule regular backups to occur automatically, ensuring data protection without manual intervention.
◆Reliable Restore: It excels in efficiency, ensuring a smooth and reliable restoration process.
Next, I will show you how to restore your Windows server system from backup with AOMEI Cyber Backup. You can click the button below to download the freeware.
Download FreewareWindows Server & PC
AOMEI Cyber Backup supports both paid and free backup version of Windows Server 2016/2019/2022/11,10,8,7.
Steps to backup Windows server with ease
1. Before backup, please download and install the AOMEI Cyber Backup Agent to ensure successful operation.
2. Bind Device: Navigate to Source Device >> Windows. Otherwise, you just need click + Add Windows Device to add your device.
3. Create Backup Task: Click Backup Task >> + Create New Task >> Disk Backup. Then specify the backup details, such as: Task Name, Device Name, Backup Content, Target, and Schedule as you need.
4. Start Backup: You can select Add the schedule and start backup now, or Add the schedule only.
Steps to restore your Windows server from backup directly
1. Go back to Backup Task and click … >> Restore on the left of the backup task to start setting up the Windows system recovery task.
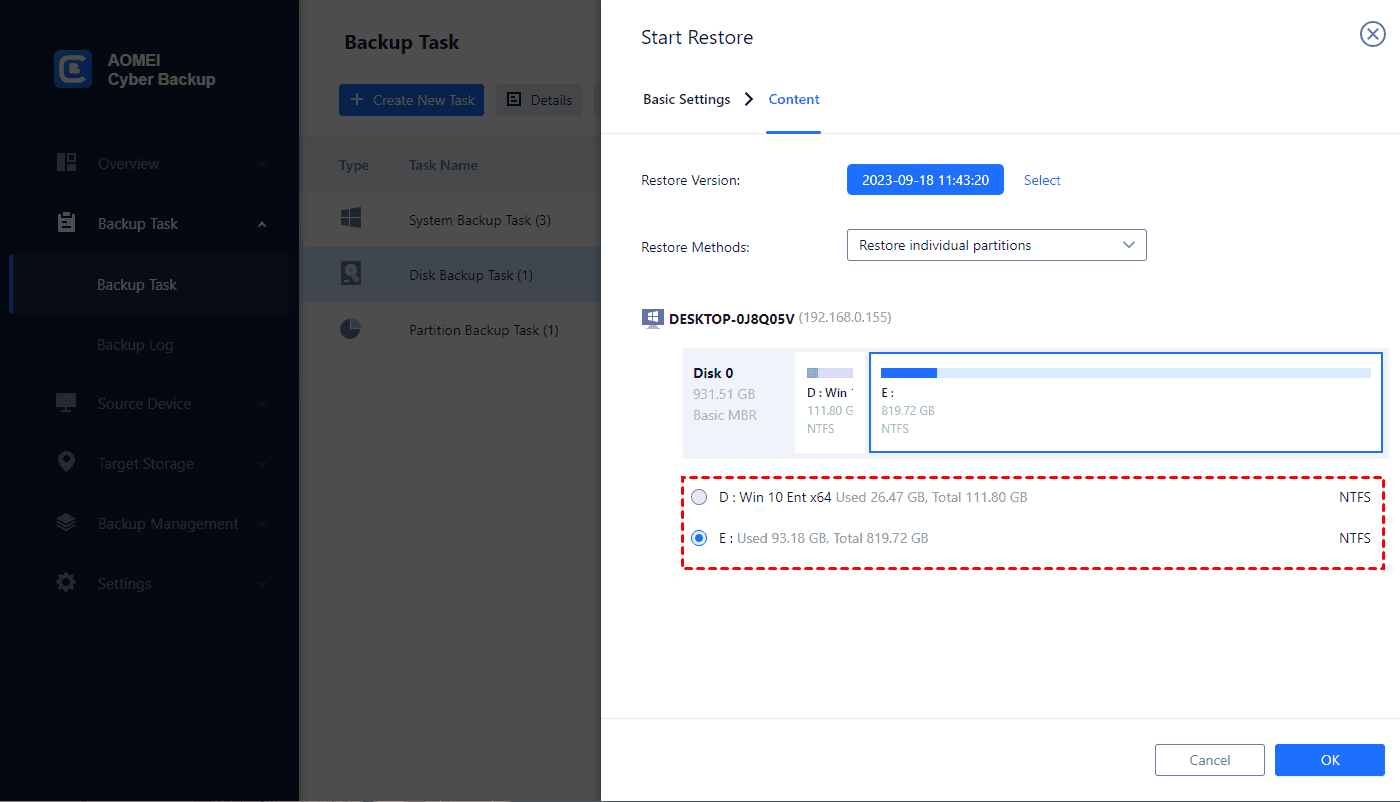
2. Choose the content to restore: In Restore Methods, you can choose to Restore the entire system or Restore individual partitions and click OK.
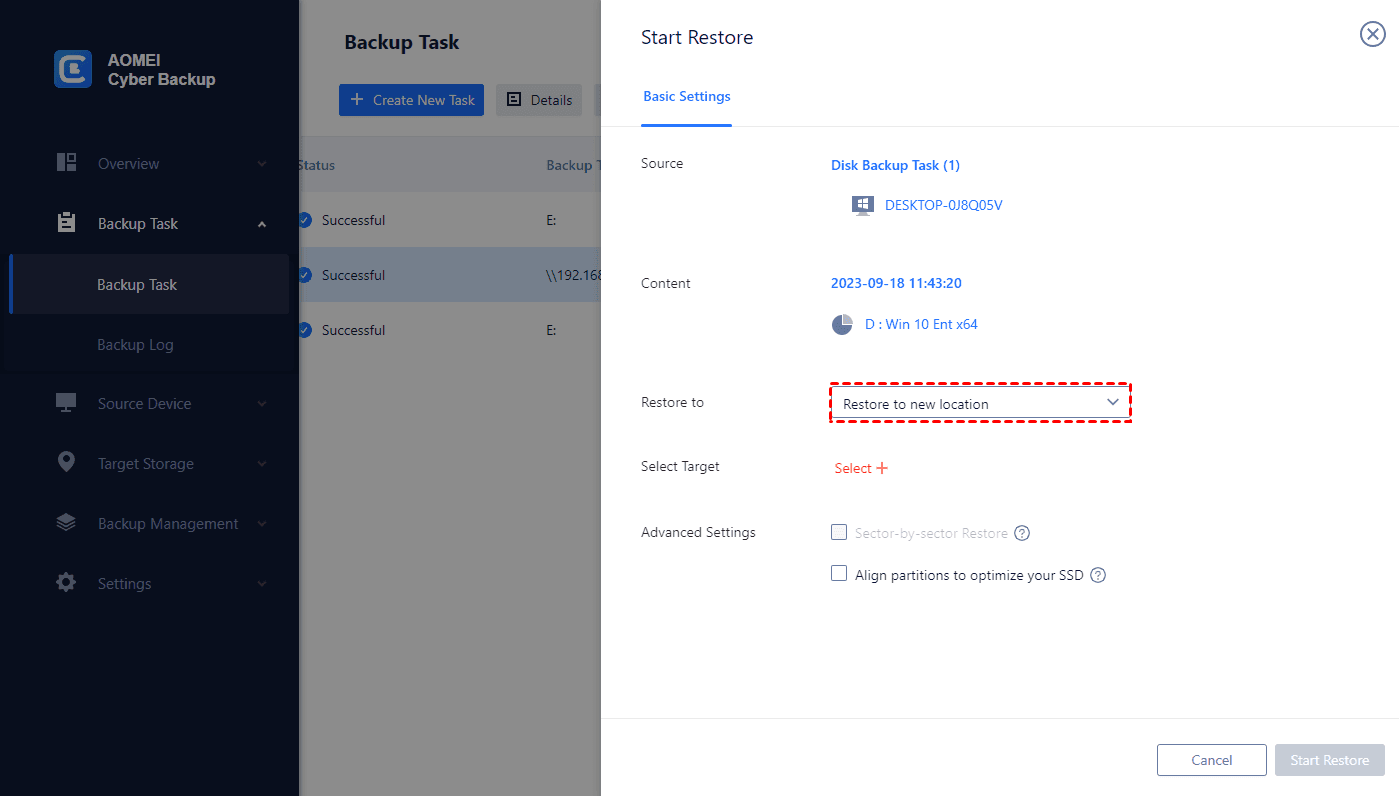
3. Choose location to restore to: Choose Restore to original location, you can easily restore the Windows system backup to its previous state.
- Restore to new location (For an upgrade): It will create identical new system data from the backup to the same or another server/host.
Conclusion
In the intricate tapestry of data management, restore points stand as threads of resilience, woven to fortify your Windows Server environment. From their inception to their role in recovery, restore points embody a powerful data safety net.
As you navigate the digital realm, armed with the knowledge of what restore points are, how they function, and how to wield them, you venture forward with the confidence of a digital guardian. Take full advantage of restore points – your partners in preserving stability and ensuring the continuity of your Windows Server ecosystem.


