By
Crystal
![]() / Last
Updated December 31, 2024
/ Last
Updated December 31, 2024
Introduction
Performing a factory reset on Windows Server 2019 allows administrators to restore the server to its original state, eliminating any customizations and configurations. This comprehensive guide provides a step-by-step walkthrough, ensuring a smooth and effective factory reset process.

Windows Server 2019 Factory Reset: A Step-by-Step Guide
Prerequisites
Before proceeding with the factory reset, it is essential to take certain precautions:
- Backup Important Data and Configurations: Perform a complete backup of critical data, applications, and configurations to avoid permanent data loss.
- Verify System Requirements: Ensure that the server meets the system requirements for the factory reset process. Check hardware specifications and available disk space to guarantee a successful reset operation.
Step 1: Accessing the Recovery Environment
To initiate the factory reset process, follow these steps:
- Restart the Server: Save any ongoing work and restart the Windows Server 2019.
- Access Advanced Startup Options: During the boot process, press the designated key (e.g., F11 or ESC) to access the Advanced Startup Options.
- Navigate to the Recovery Environment: In the Advanced Startup Options menu, select the "Troubleshoot" option, followed by "Advanced options." From there, choose "Recovery" and proceed to the next step.
Step 2: Choosing the Factory Reset Option
In the Recovery Environment, follow these steps:
- Explore Available Reset Options: In the Recovery menu, you will find various options. Choose the "Reset this PC" option, which will allow you to reset the server to its default settings.
- Select Reset Preferences: Depending on your requirements, choose between the "Keep my files" or "Remove everything" options. The former retains your personal files, while the latter removes all data from the server.
Step 3: Selecting Reset Preferences
Consider the following when selecting reset preferences:
- Understanding Reset Preferences: Take the time to understand the implications of each reset preference. Consider whether you need to retain personal files or perform a complete data wipe.
- Choose Preferred Option: Based on your assessment, select the appropriate reset preference that aligns with your needs and click on the corresponding option.
Step 4: Initiating the Factory Reset Process
To initiate the factory reset, follow these steps:
- Confirm the Reset Process: A confirmation message will appear, summarizing the chosen reset preference. Review the information carefully, ensuring it aligns with your intentions. Click on "Reset" to proceed.
- Allow the System to Reset: The system will begin the factory reset process. This may take some time, so be patient and avoid interrupting the process.
Step 5: Completing the Factory Reset
After the reset process completes, follow these steps:
- Monitor the Reset Progress: The system will display the progress of the factory reset. Monitor the on-screen information to track the completion status.
- Restart the Server and Configure Initial Settings: Once the factory reset is complete, the server will restart. Follow the on-screen instructions to configure initial settings, such as language, region, andtime zone. Customize any additional settings according to your requirements.
Free but Powerful Windows Server Backup and Restore Tool
AOMEI Cyber Backup simplifies the process of performing a Windows Server bare-metal backup, ensuring that your critical data and system are protected against unexpected disasters. Regularly schedule backups to keep your server environment safe and secure.
This is precisely what the offers:
❋ Flexibility: Whether you're a small business or a big enterprise, our software can grow with you.
❋ Cost-Effective: Investing in our software is a smart move compared to the potential costs of data loss and downtime.
❋ Quick Recovery: If you ever lose data or your system fails, our software helps you recover fast, reducing downtime.
❋ User-Friendly Interface: A user-friendly interface makes the backup process intuitive and accessible, even for users with limited technical expertise. This ease of use streamlines the backup process and reduces the risk of errors.
❋ Scheduling and Automation: Scheduling options enable you to automate regular backups which ensures that your Windows Server remains protected with minimal manual intervention, reducing the risk of oversight or missed backups.
✍It supports Windows Server 2016/2019/2022/2025 and 11,10,8,7. Please download AOMEI Cyber Backup from the button below to create a Windows server backup for free.
✢ First, you need to install the AOMEI Cyber Backup Agent on your target device and connect to AOMEI Cyber Backup Management Server.
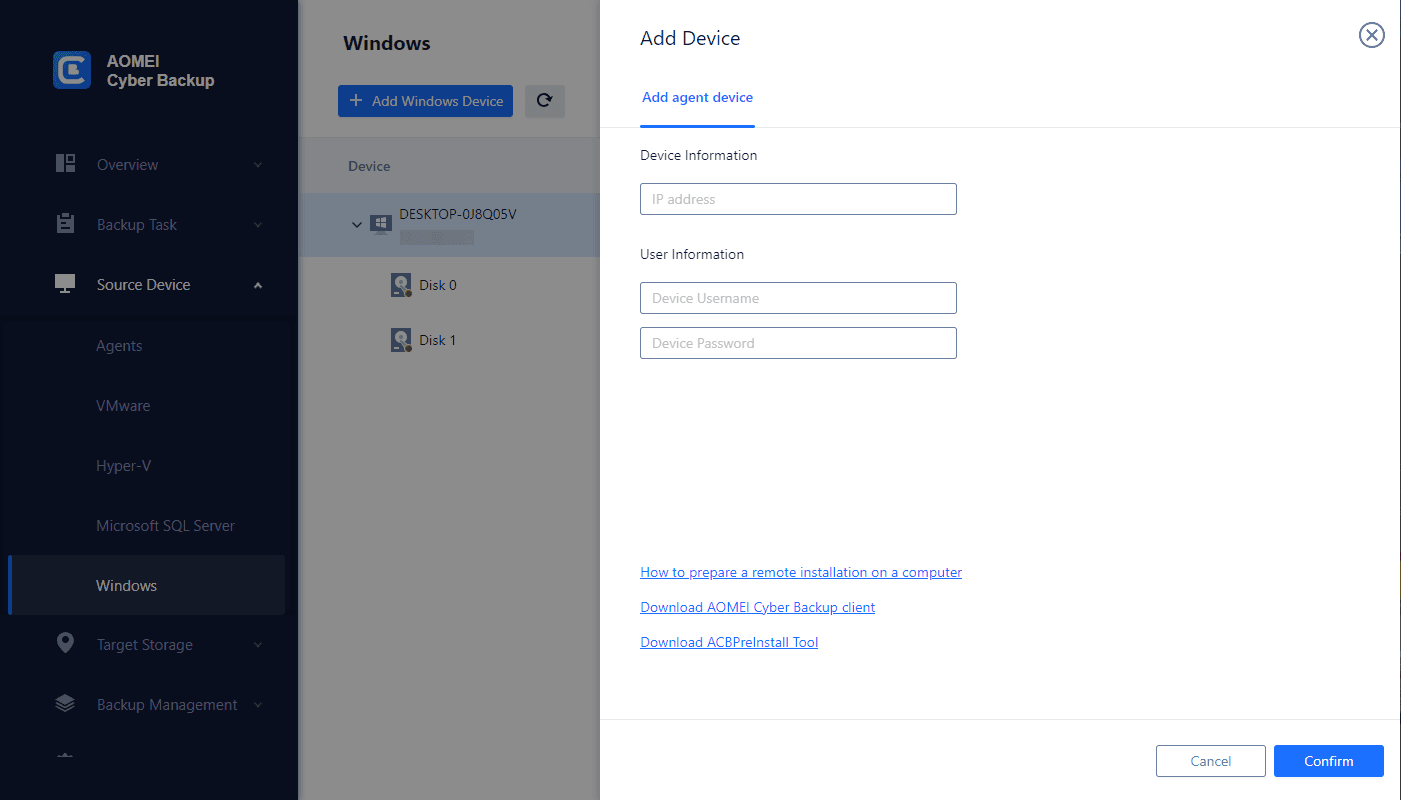
☞ Add Device:
- Navigate to Source Device to Add Windows Device, then fill in the correct IP address and user information.
☞ Create Backup Task:
- Click Create New Task >> System Backup.
- Select the Windows Server system to back up.
- Choose a destination to save the backup.
- Schedule backup method as full / incremental / differential backup and run the backup tasks at daily / weekly / monthly.
- Click Start Backup to protect your Windows Server system.
☞ Restore Windows Server:
- Click Restore to recover the Windows Server system quickly when the unforeseen happens.
- Select the system you want to restore.
- Click Restore to original location to create a same Windows Server system.
✨While the Free Edition covers most of the VM backup needs, you can also upgrade to enjoy:
✦ Backup cleanup: Configure retention policy to auto delete the old backup files and save storage space.
✦ Restore to new location: Easily make a clone of a Windows Server without any complex configuration or reinstallation.
Conclusion
Performing a factory reset on Windows Server 2019 is a valuable process to restore the server to its default configuration. This step-by-step guide has provided a comprehensive walkthrough of the factory reset process, ensuring a smooth and effective reset operation.
Remember to perform post-reset configurations and restore any necessary data and configurations from your backups. By following this guide, administrators can confidently perform a factory reset on Windows Server 2019 and optimize their server's functionality and performance.
Best Enterprise Backup Solution

- VMware and Hyper-V Backup
- SQL Server/Workstation Backup
- Scheduled Automatic Backup
- Flexible Backup Cleanup Policy
- Backup and Manage Centrally


Still Need Help?
Have your problem been solved? If not, please input query in the search box below.