[7 Tips] How to Fix iCloud Music Library Cannot be Enabled
Can’t enable iCloud music library on iPhone? Here is a complete guide to help you fix iCloud music library cannot be enabled problem.
By Lena / Updated on June 6, 2023
How do I fix “iCloud music library couldn’t be enabled”?
Every time I tried to enable the iCloud Music Library, I’d get the same error message saying "iCloud Music Library couldn’t be enabled." How can I get this thing to work again?
- Question from Apple Community
iCloud Music Library is a great feature for music lovers like you. It contains all your favorite songs and allows you to access your library on all devices. However, now you find that you cannot turn on iCloud music library on your iPhone. When you try to turn it on, a message pops up and says that iCloud music library couldn’t be enabled, like the picture shown below.

It's very frustrating to encounter such iCloud music library cannot be enabled error. You cannot access your music library let alone listen to your favorite songs. Why iCloud music library cannot be enabled? Generally speaking, this problem usually occurs due to issues of Apple servers or errors of iTunes. Don’t worry too much, there are some tips that can help you get rid of the error message.
How to Fix iCloud Music Library Cannot be Enabled Problem
You can try the following methods in turn to troubleshoot the problem.
Tip 1. Check Apple System Status Page
As mentioned before, the iPhone iCloud music library cannot be enabled error will occur when there is a problem with Apple servers. You can first go to Apple System Status page to have a check if there are interruptions of Apple Music.

Find Apple Music and check its status. If it is not green, it means that there is something wrong and you should be patient and wait for Apple to solve it. If it is green, then the server is working well, please move to the next solution.
Tip 2. Try to Turn on Sync Library
You can try to turn on Sync Library option several times until it works.
Go to Settings app > Tap Music > Turn on Sync Library > Choose to Keep Music or Delete & Replace > If you get the error message, dismiss it > Wait a while and repeat the steps.
Tip 3. Hard Reset Your iPhone
It may help fix system glitches that caused the Apple music iCloud library cannot be enabled problem.
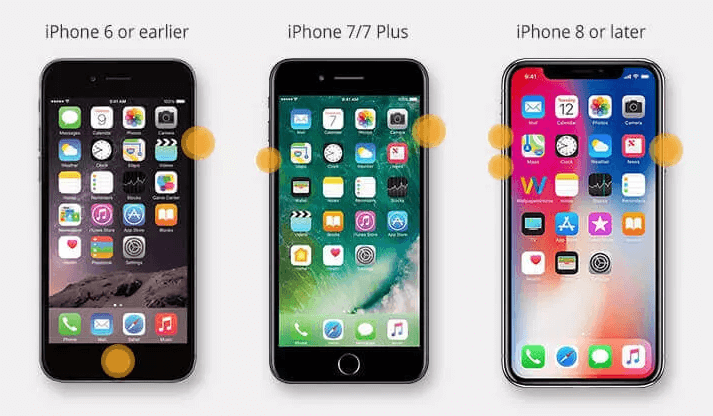
iPhone 8 or later: Press the volume + button and then quickly release. Press the volume - button and then quickly release. Press the side button for seconds until you see the Apple logo.
iPhone 7/7 Plus: Press both the power button and volume - button for seconds until you see the Apple logo.
iPhone 6s or earlier: Press both the power button and the Home button for seconds until you see the Apple logo.
Tip 4. Sign Out of iCloud Account and then Sign in
Go Settings app > Tap your account > Tap Sign Out. Wait a few seconds and then go to sign back in and try to turn on iCloud music library.
Tip 5. Check Internet Connection
iCloud requires a stable Internet connection to work. The iCloud music library cannot be enabled problem will occur due to the network connection. You should make sure that your iPhone has connected to strong Wi-Fi. Here are three ways to fresh the Internet connection.
- Restart the router.
- Turn on and off Airplane mode.
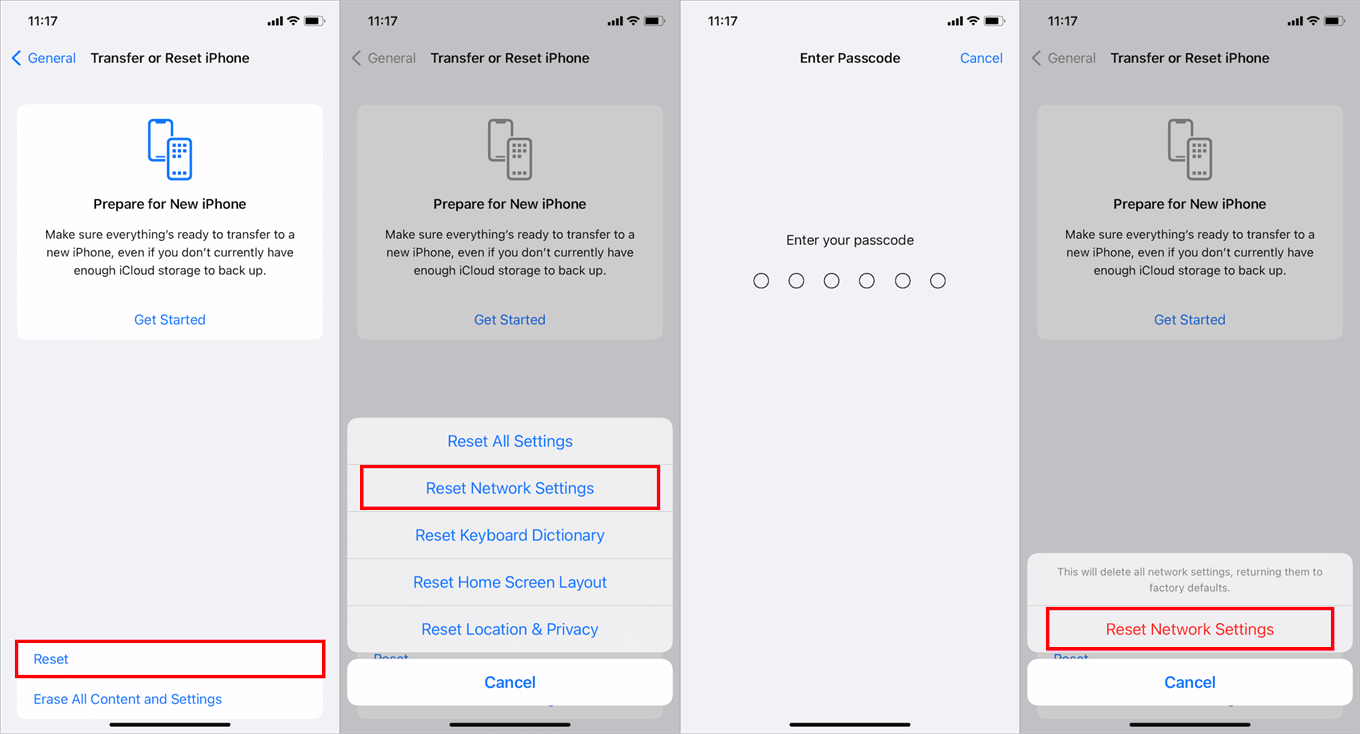
- Reset Network Settings. Go to Settings > General > Reset (Transfer or Reset iPhone > Reset in iOS 15 and later) > Reset Network Settings to make it.
Tip 6. Restore Your iPhone
If all the above methods cannot help you fix the iCloud music library couldn’t be enabled problem, you can choose to restore your iPhone to factory settings.
The reset will delete all the data on your device, so please back up your iPhone before restoring. You can choose to make a full backup with iCloud and iTunes. If you want to only backup some important data to save time and energy, you can let one third-party iOS data management tool called FoneTool help you backup iPhone to computer, external hard drive, USB flash drive.
The Selective Backup feature can help you backup selected music, videos, photos, contacts, messages, etc. In addition, it supports selective restoration. You can only restore needed files to iPhone to save iPhone space. For detailed steps, you can go to this How to Backup iPhone to Computer guide to learn more.

Steps to restore iPhone
Reset iPhone via Settings: Go to Settings > Tap General > Tap Reset (Transfer or Restet iPhone in iOS 15) > Choose Erase All Content and Settings.

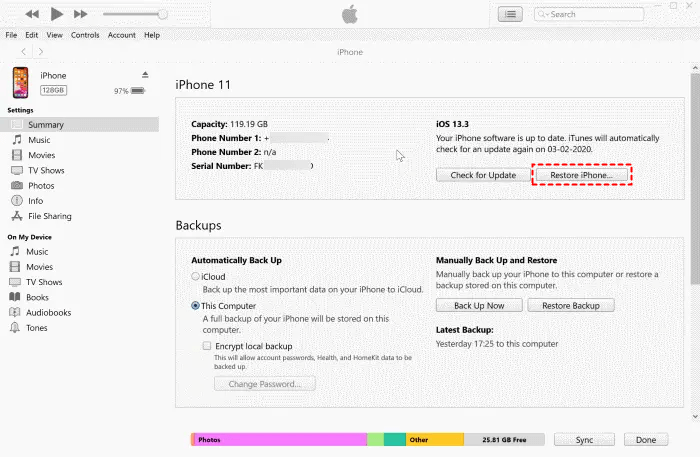
Restore iPhone with iTunes: Open iTunes and plug in iPhone > Click the Device tab > Choose the Restore iPhone... option.
Tip 7. Try Other Tools to Transfer Your Music
If you do not want to restore your iPhone, you may let FoneTool help you transfer music to the target place. It can help you transfer music from computer to iPhone, transfer music from iPhone to computer, or transfer music from one iPhone to another one.
✓ It can help you transfer both purchased and non-purchased music.
✓ It’s able to transfer music from iPhone/iPad to another one with different Apple IDs. That’s to say, you can easily share music with family and friends.
How to Transfer Music from Computer to iPhone
1. Download, install and launch FoneTool.
2. Click Phone Transfer > Go to PC to iPhone and click Start Transfer. If you want to transfer music from iPhone to computer, you should choose iPhone to PC instead.

3. Click Music icon > Click anywhere in the box to choose the songs. You can choose to transfer iTunes library to iPhone.

4. Click Start Transfer to add music to your iPhone.

Final Words
That’s all about how to fix iCloud music library cannot be enabled. Hope one of these methods can help you get out of trouble. If the problem still exists, you can contact Apple support online or take your iPhone to the Apple Store to let the professionals have a check.