[Detailed Guide] How to Take RAW Photos on iPhone 11/12/13/14
You may hear about RAW photos and want to take RAW photos on iPhone. This guide provides you with all you may concern about what RAW is and how to take RAW photos on iPhone 11/12/13/14 in detail.
By Demi / Updated on May 25, 2023
Shoot RAW on iPhone 12 Pro
I just got an iPhone 12 Pro. I’d like to shoot RAW but the built-in camera app doesn’t offer RAW photos. I think I need a 3rd-party camera app. Does anyone have any suggestions? I don’t want to edit on the phone. Just need an app to create DNG photos for me to import & edit on the PC.
- Question from Apple Community
Compared with DSLR, more and more people choose to take photos using their iPhone due to its portability. Generally, you may save photos in JPG. or HEIC. format on iPhone. But now, to have more editing flexibility later, you may want to shoot RAW on iPhone like what you can do on DSLR. Luckily, here comes the guide provides you with every detail about RAW on iPhone and how to take RAW photos on iPhone 11/12/13.
Overviews of RAW photos on iPhone
You may hear about RAW photos but don’t know what it is exactly. If necessary, you can have a more clear idea about RAW photos on iPhone with the Q&As below.
What is a RAW photo on iPhone?
Literally, the word “raw” means without processed. In other words, the RAW images contain all of the information recorded by the camera’s sensor during exposure. Therefore, RAW photos are also called digital film.
What are the differences between RAW and JPG photos?
In conclusion, the JPGs can be seen as the processed data from RAWs, which means the JPGs have been compressed by the camera.
Here’s a side-by-side comparison of a JPG and RAW file to help you better understand the difference between them.

Besides, since RAWs contain more information than JPGs, the file size of RAWs can be much bigger, which are usually as ten times big as JPGs.
What are the advantages of RAW photos?
The followings are some of the advantages of RAW photos over JPGs.
✓ More shades of colors compared with JPGs
✓ Higher image quality
✓ Finer control of processing the photo
What are the drawbacks of RAW photos on iPhone?
The RAW photos also bring some drawbacks at the same time.
✕ RAW photos take up much space on iPhone. (most obvious)
✕ The RAWs are less widely accepted, so that specialized software is required to open RAW files.
If you’re serious about taking high-quality photos on iPhone, then the RAW can be a nice choice. To avoid the iPhone space running out quickly, it’s suggested to transfer the photos from iPhone to computer as soon as possible.
How to take RAW photos on iPhone 11/12/13/14
There are two ways to take RAW photos on iPhone. Depending on the type of your iPhone, you can choose either of them to make it.
Shoot RAW photos on iPhone in Apple ProRAW
The Apple ProRAW function, which combines a standard RAW format with iPhone image processing, makes it possible to shoot images in ProRAW format using any of the cameras on iPhone.
Notes:
• Models that support Apple ProRAW: iPhone 12 Pro, iPhone 12 Pro Max, iPhone 13 Pro, iPhone 13 Pro Max with iOS 14.3 and later.
• You are not allowed to use ProRAW with Live photos, in Portrait mode, or when shooting videos.
To Take RAW photos on iPhone in ProRAW, you just need to enable Apple ProRAW and turn RAW on in the Camera app.
To enable Apple ProRAW, go to Settings on your iPhone > Camera > Formats > Then, turn on Apple ProRAW under Photo Capture.

To take a ProRAW photo, go to the Camera app on your iPhone, and tap on the RAW icon in the upper-right corner.

Shoot RAW photos on iPhone with Halide (more compatible)
If you’re using other models of iPhone, there are some third-party apps available for you to take RAW photos on iPhone. The Halide app is one of them. Please note Halide is not free, but it’s worth spending $5.99 enjoying your iPhone as a camera regularly.
Here’s how to take RAW images on iPhone with Halide.
Step 1. Go to the Halide on your iPhone > Swipe up to reveal Settings > Tap the Seeings gear icon.

Step 2. Choose Capture > Toggle on the Coverage option > Choose RAW+ or RAW.

Tip: The difference between RAW+ and RAW
• RAW+ takes RAW photos along with a processed HEIC image.
• RAW captures a single RAW file.
Bonus: Transfer RAW photos to computer for further editing
To free up iPhone storage space or edit RAW photos with powerful software like Lightroom and Photoshop, you may need a powerful transfer tool to transfer RAW photos to computer first. FoneTool, the transfer software for iOS devices, is highly recommended for you.
Features and advantages of FoneTool
✓ Support multiple types of pictures. It supports pictures in .jpg .png .gif .heic .jpeg .crw .cr2 .cr3 and so on.
✓ Fast and selective transfer process. With FoneTool, you’re free to preview and transfer the specific photos to computer. It just takes a few seconds to finish transferring 100 photos.
✓ Optional transfer destinations. To avoid the RAW photos taking up much space on your computer, FoneTool allows you to transfer files from iPhone to external hard drive, NAS, etc.
✓ Wide compatibility. FoneTool is perfectly compatible with iPhones from iPhone 4 to iPhone 14, iPad, and iPod. It also supports iOS to iOS 16/15.
Free download FoneTool to your computer by clicking the icon below. Then, follow the three steps to transfer RAW photos from iPhone to PC.
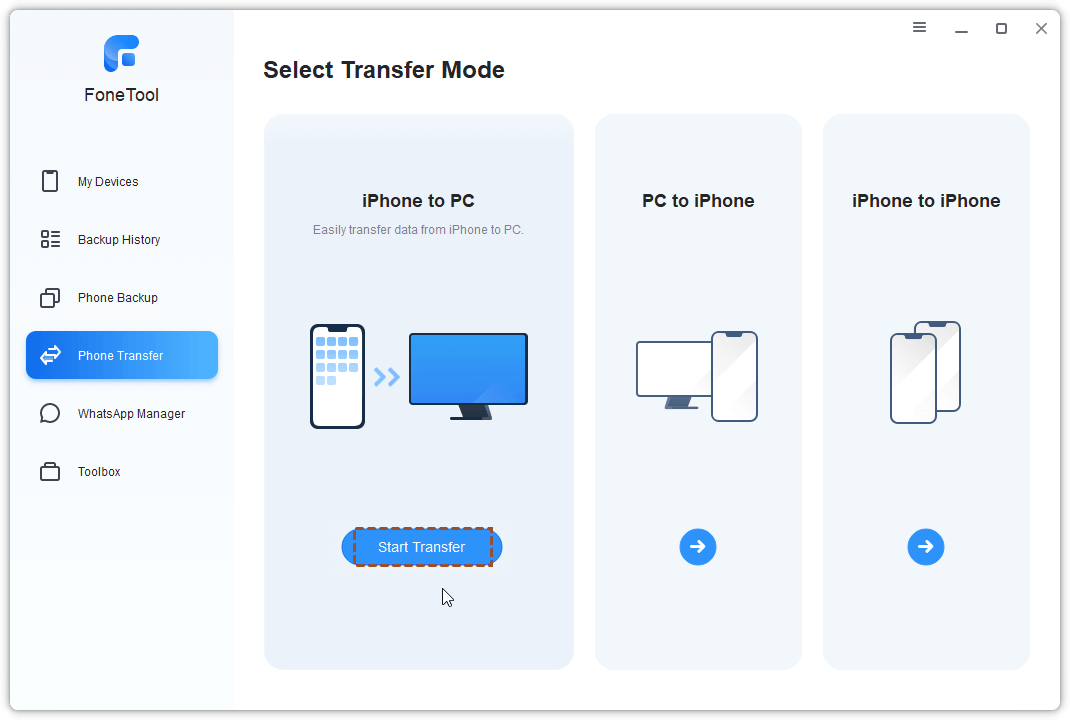
Step 1. Connect your iPhone to computer with USB > Launch FoneTool > Click Phone Transfer > Locate iPhone to PC and click Start Transfer.
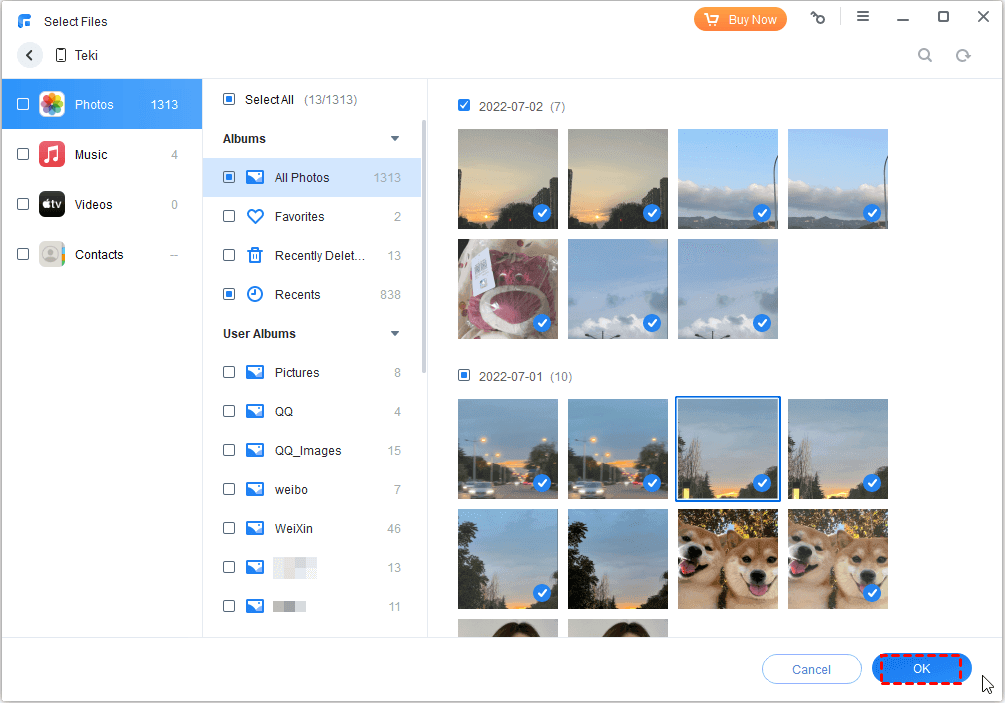
Step 2. Click the + icon > check the Photos icon to preview and select the RAW photos you’d like to transfer to computer > Click OK to confirm.
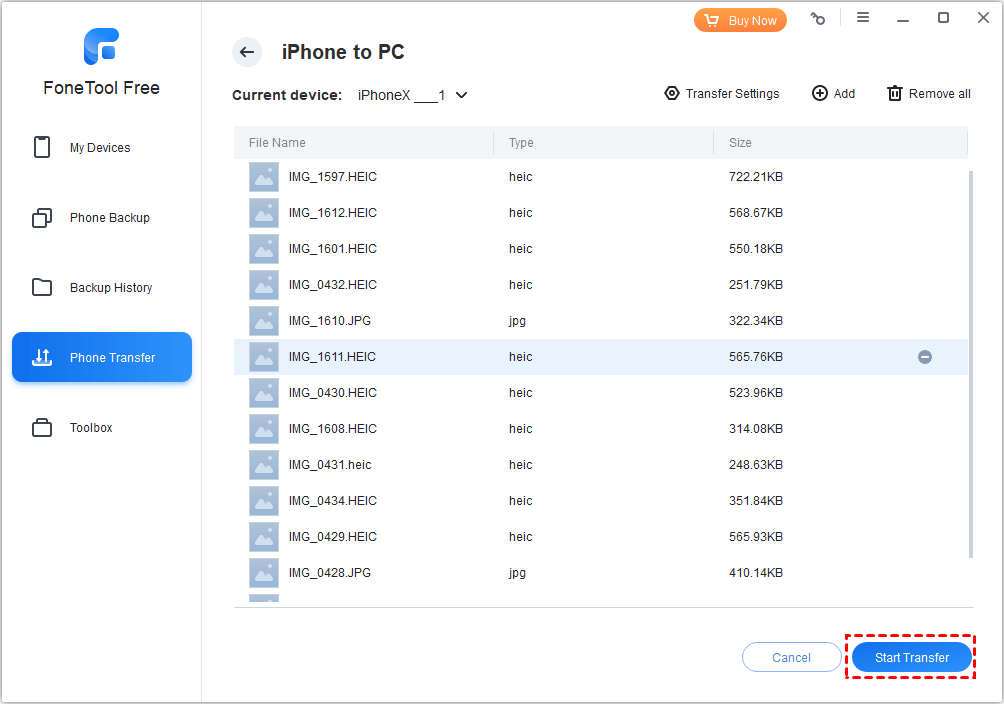
Step 3. Choose a storage path from Transfer Settings to save the photos > Click Start Transfer to begin the task.
When it is finished, you can locate them on your PC. Now, you’re free to edit RAW photos on PC. Want to save these processed photos on iPhone or share with others? The powerful transfer function in FoneTool also enables you to transfer photos from computer to iPhone without effort.
Conclusion
That’s all for how to take RAW photos on iPhone. In conclusion, if you prefer taking high-quality photos on iPhone, you can try Apple ProRAW or third-party apps like Halide.
To edit RAW photos on PC with professional software, it’s suggested to transfer photos to computer using FoneTool. Please share this guide if it helps you.
