Stepwise Guide: Transfer Audio Files from iPhone to PC
How to transfer audio files from iPhone to PC easily and quickly? This message will give you detailed instructions and you can get a great bonus tip to clear up your iPhone data.
By Kathy / Updated on August 3, 2023
Can you transfer audio files from iPhone to PC?
As a built-in app on your iPhone, Voice Memos allows you to effortlessly record audio for a long period, which offers great convenience in preserving important voice content.
However, Voice Memos usually record voice in high quality, a ton of audio will always trouble you a lot. How to clear up iPhone storage by deleting audio files without losing them? Then transferring audio files from iPhone to PC will be a good way.
Although using different systems, moving data from iPhone to Windows PC is also feasible. And you can keep viewing the 4 ways below to finish the process. Besides, If you need to back up or erase your iPhone directly, you can skip to the third part.
How to transfer audio files from iPhone to PC
There are 4 efficient ways for you to move audio files from iPhone to your computer. And you can choose a better method to complete the process with or without iTunes as you like.
Moving audio files with iTunes
To enable the synchronization of audio files recorded with Voice Memos to iTunes, ensure that this option is turned on within iTunes.
To set up Voice Memos syncing, follow these steps:
Step 1. Connect your iPhone to the computer and launch the iTunes application. In the iTunes menu, find your iPhone icon and tap it.

Step 2. Navigate to the Music section and locate the options Sync Music and Include voice memos, then check the two boxes next to them and click Sync to start the audio files moving.
Step 3. After completing the sync process, navigate to the drive where Windows is typically installed, which is usually named the "C" drive, and your audio files will be stored in the following location in most cases:
C:\Users\UserName\Music\iTunes\iTunes Media\Voice Memos
- Note:✎...
- In the above path, C is your Windows PC’s drive, and UserName is your actual user account name.
If you need to know how to transfer audio files from iPhone to computer without iTunes. You can choose to use a cloud storage service such as iCloud/Google Drive or send them to PC by e-mail.
Moving audio files with iCloud
You can also try to migrate audio files with iCloud, but it’s important to note that iCloud only provides 5 GB of storage space for free users to sync data. So if you need to transfer a large number of files, this way is inappropriate. And how to transfer audio files from iPhone to PC via iCloud:
Step 1. Go to Settings > Apple ID > iCloud on your iPhone, check if the iCloud Drive is toggled on. If not, turn it on.
Step 2. Launch the Voice Memos app on your iPhone, choose the needed recording and tap the three-dots icon to access additional options. Then click Save to Files > iCloud Drive > Save.

Moving audio files with Google Drive / Dropbox / OneDrive
Using cloud storage services such as Google Drive, Dropbox and One Drive is another available way to move your audio files to a computer. Here we take Google Drive as an example to show you how to transfer audio recordings from iPhone to PC:
Step 1. Download the Google Drive app for free and sign in with your Google Account on your iPhone.
Step 2. Access the Voice Memos app and select your desired voice recordings, then click on the three-dots icon to get additional options. After that, hit Share, select Google Drive from the apps list and click Upload.

After the upload process is finished, open Google Drive using your desktop web browser to access the recordings and download them to your PC.
Sending audio files by e-mail
When you just need to import a few recordings to your Windows PC, sending an e-mail can be a good method to make it. Because it only allows you to send audio files one by one. And now you can follow the guidance below to get how to copy audio files from iPhone to PC via e-mail.
Step 1. Open the Voice Memos app on your iPhone.
Step 2. Select the voice memo that you want to send via email to your Windows PC. Keep in mind that you can only send one voice memo at a time.
Step 3. Click Share icon, then choose Mail icon. The Mail app will automatically attach the chosen memo and fill in the Subject field. All you need to do is type in your email address and then tap Send to send the selected voice memo.

Step 4. Once the e-mail is sent, log in your email account on your Windows PC, then download the audio files attachment to your computer.
After the audio files transfer process, you may find out that your iPhone storage issue is still almost full, even though you delete all audio files on the phone. Then you can view the bonus tip below to get the best iPhone data management tool to fix your issue.
Bonus tip: Easily manage iPhone data
As a professional data backup and iPhone eraser app, FoneTool will help you selectively or fully back up your iPhone, and you can also use this tool to erase your private data to clear up the iPhone space.
Now you can download the software which is widely compatible with all models of iPhone/iPad/iPod Touch to selectively back up your iPhone.
Step 1. Connect your iPhone to the Windows PC using a USB cable. Install and launch FoneTool on your computer.
Step 2. Choose Phone Backup > Go to Selective Backup and click Get Started.
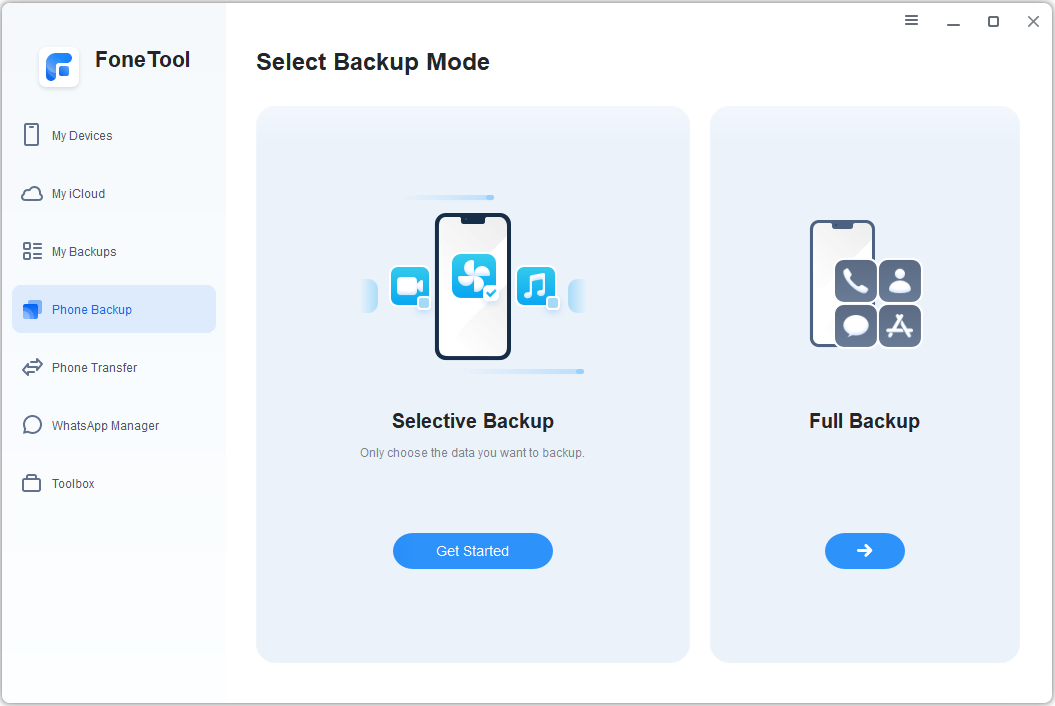
Step 3. Click each icon to select the files you want to back up to computer, then click OK.

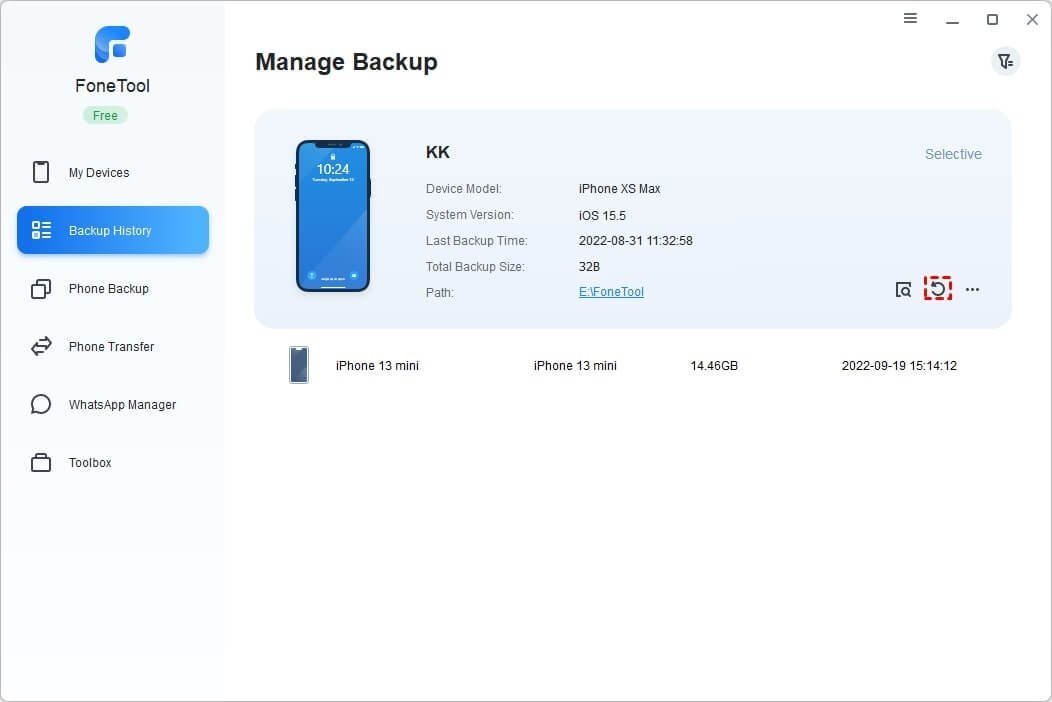
Once the backup is completed, you can restore the backup by entering Backup History from the left menu and clicking Restore to finish the process.
Besides, you can also use FoneTool to delete read-only contacts and Safari history on your iPhone permanently.
Conclusion
Hope you can know how to transfer audio files from iPhone to PC from this article completely. In addition, if you need a professional iPhone data management tool, FoneTool will give you a great experience. With this app, you don’t need to worry about losing data and can transfer data from iPhone to iPhone easily.
