Top 7 Solutions to iPad Won’t Connect to iTunes
If your iPad cannot connect to iTunes, you cannot backup or sync your iPad definitely. To get out of iPad won’t connect to iTunes issue,you can try the 7 solutions mentioned in this guide.
By Demi / Updated on June 9, 2023
iPad cannot connect to iTunes
My iPad will now not connect to iTunes. I got a message saying “iTunes could not connect to this iPad. An unknown error occurred (0xE800001C).
- Question from Apple Community
You are plugging your iPad into computer, launching iTunes, and ready to backup iPad or transfer iTunes playlist to iPad/iPhone, but something goes wrong. You may fail to find the phone icon in iTunes’s toolbar or receive a prompt saying “ iTunes could not connect to this iPad because an unknown error occurred.”

It’s disappointed when your iPad won’t connect to iTunes. If you encounter the issue, keep reading and this guide can help you out.
Possible reasons why iPad cannot connect to iTunes
You may wonder why your iPad cannot connect to iTunes. It’s mainly due to the Internet connection issues like a slow network. Besides, an outdated operating system on iPad or an outdated iTunes can also cause this issue.
Aside from these two primary reasons, there are a few more causes for this error.
7 fixes to iPad won’t connect to iTunes on Windows 11/10
Before trying these solutions, you can simply restart your iPad and computer, try another USB port to see whether the issue is solved. If they don’t work, then let’s look at the top 7 solutions to iPad won’t connect to iTunes. You can try them one after another until your trouble gets fixed. Optionally, you can turn to the next part to backup iPhone with the best iTunes alternative.
Quick Review:
- Tip 1. Check Apple's System Status
- Tip 2. Fix network connection
- Tip 3. Modify Date & Time on iPad
- Tip 4. Check for iOS and iTunes updates
- Tip 5. Update your Apple ID in iTunes & App Store
- Tip6. Reset Location & Privacy settings
- Tip 7. Reinstall Apple's Windows drivers
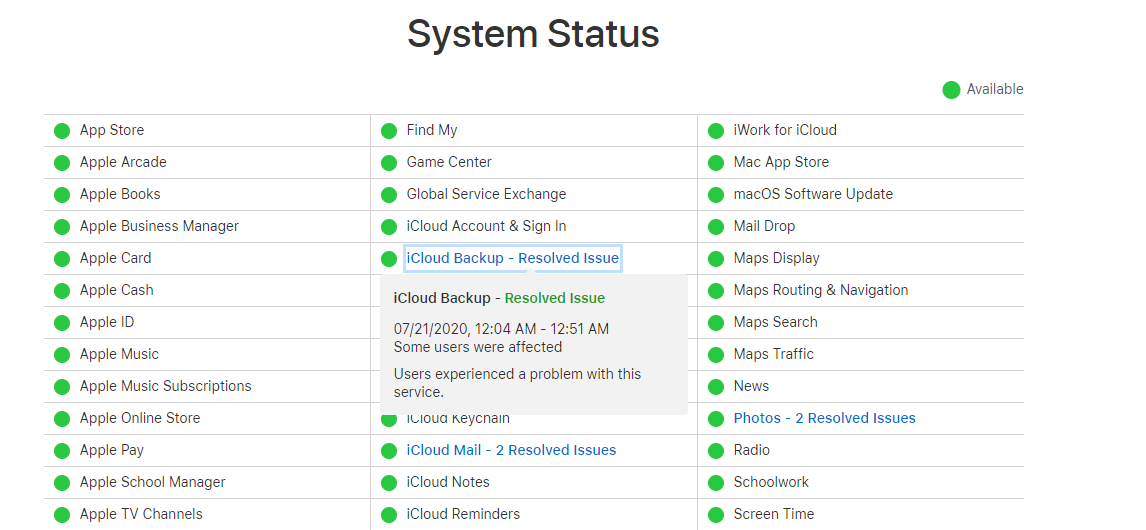
Tip 1. Check Apple’s System Status
No matter what issue you encounter with iOS devices and services, you could go to the website of Apple's System Status to check if iTunes works properly. If it is available, turn to the next tip. Or, you may need to wait for Apple to fix the issue or have a try by yourself.
Tip 2. Fix network connection
As mentioned before, the issue can occur due to Internet connection issues. So please make sure your network is configured correctly. You’d better visit a website or app to have a check.
If you’re using your mobile data, you can turn it off and on again to check whether your data plan is active.
If you’re using a Wi-Fi connection, please make sure that you’re within the Wi-Fi range.
Tip 3. Modify Date & Time on iPad
You can also check the Date & Time settings on iPad to have a try. It usually corrects several potential problems, connection issues with iTunes may be one of them.
You can go to Settings on your iPad > General > Choose Date & Time > Toggle on Set Automatically to avoid any issues that result from this in the future.

Tip 4. Check for iOS and iTunes updates
An outdated operating system and iTunes can lead to kinds of issues. Getting the latest versions of iOS and iTunes might allow your iPad to connect to iTunes again since there may be software bugs that are related to the issue.
To update iOS: On your iPad, go to the Settings app > Tap General > If there is a new iOS available, tap Software Update to update it.
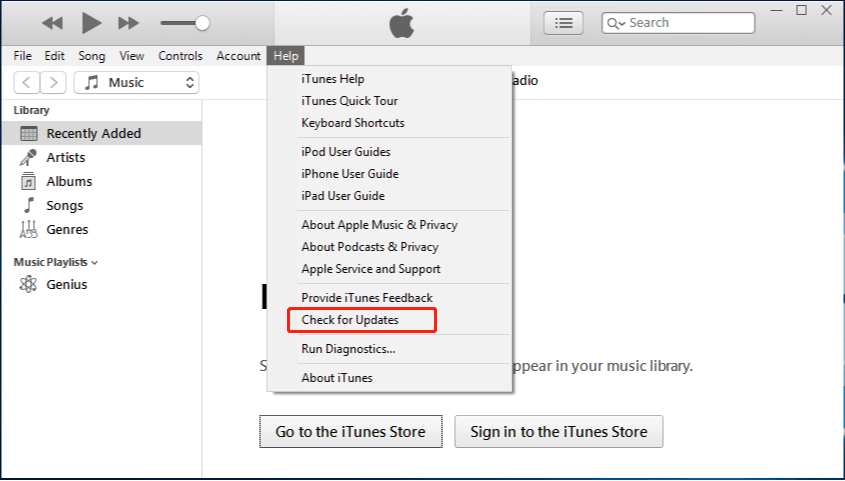
To update iTunes: Open iTunes on your computer > Click Help from the top toolbar > Tap Check for Updates to check and update iTunes.
Tip 5. Update your Apple ID in iTunes & App Store
If you have changed your Apple ID or password recently, you may need to sign out and in again your Apple ID to have an update. Just go to Settings on your iPad > [your name] > Tap iTunes & App Store > Tap your Apple ID and sign out > Sign in your Apple ID again. You may also need to verify your payment information from here.

Tip 6. Reset Location & Privacy settings
Generally speaking, when you connect iPad to computer and run iTunes, you need to tap Trust on your iPad for further operations. However, if you tap “Don’t Trust” by accident, you may find iPad can’t connect to iTunes and the message won’t pop up again.
To fix the issue, you can reset Location & Privacy settings on iPad. Go to Settings app on your iPad > General > Reset > Choose Reset Location & Privacy.

Tip 7. Reinstall Apple’s Windows drivers
If your iPad still cannot connect to iTunes after trying the solutions above, it may be the last chance that you can fix it on your own. The last solution may spend some time but is worth trying. To avoid any errors from Apple’s Windows drives, you may need to reinstall them.
Step 1. Close iTunes > Connect your iPad to computer with USB > Go to the Start menu and tap in Device Manager in the search bar > Tap Device Manager option.
Step 2. In the Device Manager screen, locate your iPad under Portable Devices > Right-click it and choose Update Driver Software.

Step 3. In the next window, choose Browse my computer for driver software > Then click Let me pick from a list of device drivers on my computer > Click Have Disk in the next screen.
Step 4. In the Install From Disk window, click Browse... and navigate to C:\Program Files\Common File\Apple\Mobile Device Support\Drivers > Double click usbaapl64.inf. > Click OK.

Now, the drivers should be reinstalled. You can run iTunes again to check whether iPad can connect to iTunes or not.
Backup your iOS devices using the best iTunes alternative
You may encounter kinds of iTunes problems when you do backup or sync. To avoid iTunes problems once for all, a professional backup and transfer tool - FoneTool is highly recommended.
With FoneTool, you can create full iPhone backup like what you used to do in iTunes. Besides, different from iTunes, FoneTool also enables you to backup only important files on your iPad/iPhone. You can also browse your backup files by visiting the tool.
FoneTool support iPhones (from iPhone 4 to the latest iPhone 13), iPad, and iPod. You can click the icon below to get it and follow the three steps below to selectively backup your iOS devices.
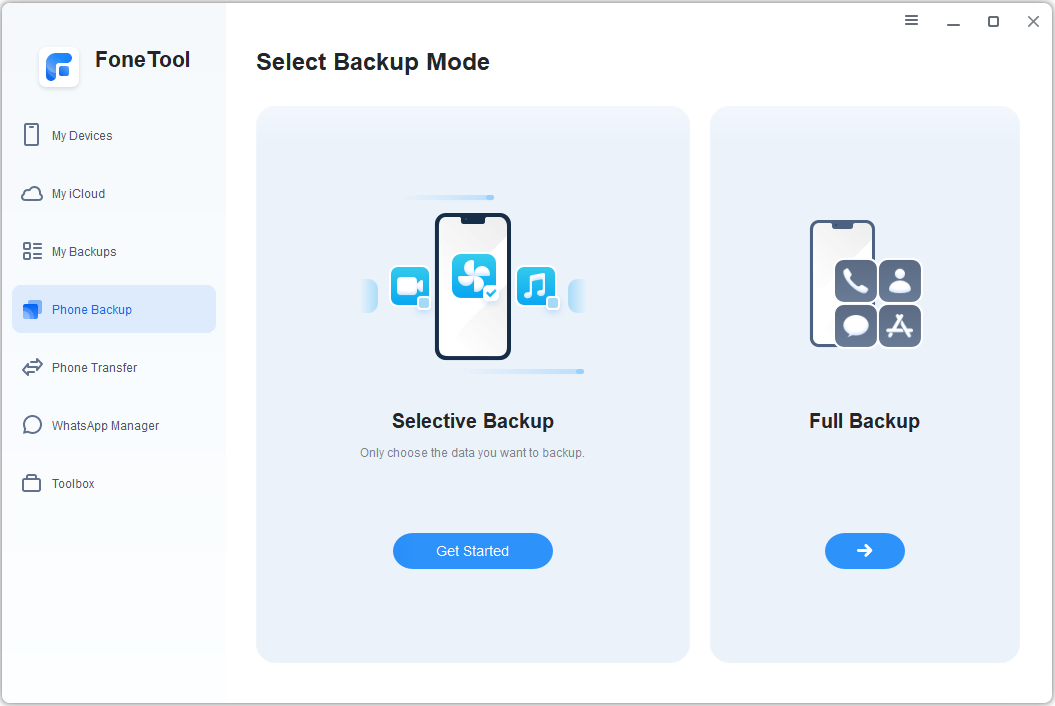
Step 1. Connect your iPad/iPhone to computer with USB > Launch FoneTool and click Phone Backup. Go to Selective Backup and click Get Started.
Step 2. Click each icon to browse and choose certain files you’d like to backup > Click OK to continue.

Step 3. Choose a folder to save your backup files > Click Start Backup to begin the task.

Note: FoneTool also allows you to backup iPhone to flash drive, NAS, etc. You can make it by simply changing the storage path.
Conclusion
That’s all for the top 7 tips to fix iPad won’t connect to iTunes. Hopefully, one of the tips has helped you out. When it comes to backing up iOS devices or transferring music from computer to iPhone/iPad, you can try the iTunes alternative mentioned in this guide with no effort. If this guide helps you, please share it with others.
