[Full Guide] iTunes Backup to External Hard Drive in 2024
Do you know how iTunes backup to external hard drive? Read on this guide and learn how to backup iTunes to an external hard drive. Let’s have a look!
By May / Updated on March 5, 2024
Why Need to Move iTunes Backup to External Hard Drive?
Before discovering the way how the iTunes backup to external hard drive, it’s necessary to know the reason why you need to backup iTunes to an external hard drive. Some of the common reasons are listed below:
Free Up Computer Storage: iTunes backups can consume significant disk space on your computer. Moving them to an external hard drive helps free up valuable storage on your system.
Security: Keeping your backups on an external hard drive adds an extra level of security because you can physically disconnect it from your computer and protect your data from potential network threats.
Prevent Data Loss: Storing backups only on your computer may pose a risk in the event of a hardware failure or malfunction.
How to Backup Data to External Hard Drive with iTunes
iTunes is a software program developed by Apple that serves not only as a media player but also as a device management utility. With iTunes, you can back up an iPhone to an external hard drive. The process involves two parts:
Part 1: Backup Your iPhone to PC
The first thing that you should do is to back up your iPhone locally to the computer using iTunes. Please follow the steps below to do that:
Step 1: Connect both your iPhone and external hard drive to your PC with two USB cables > If prompted, tap Trust on your iPhone’s screen to authorize the connection.

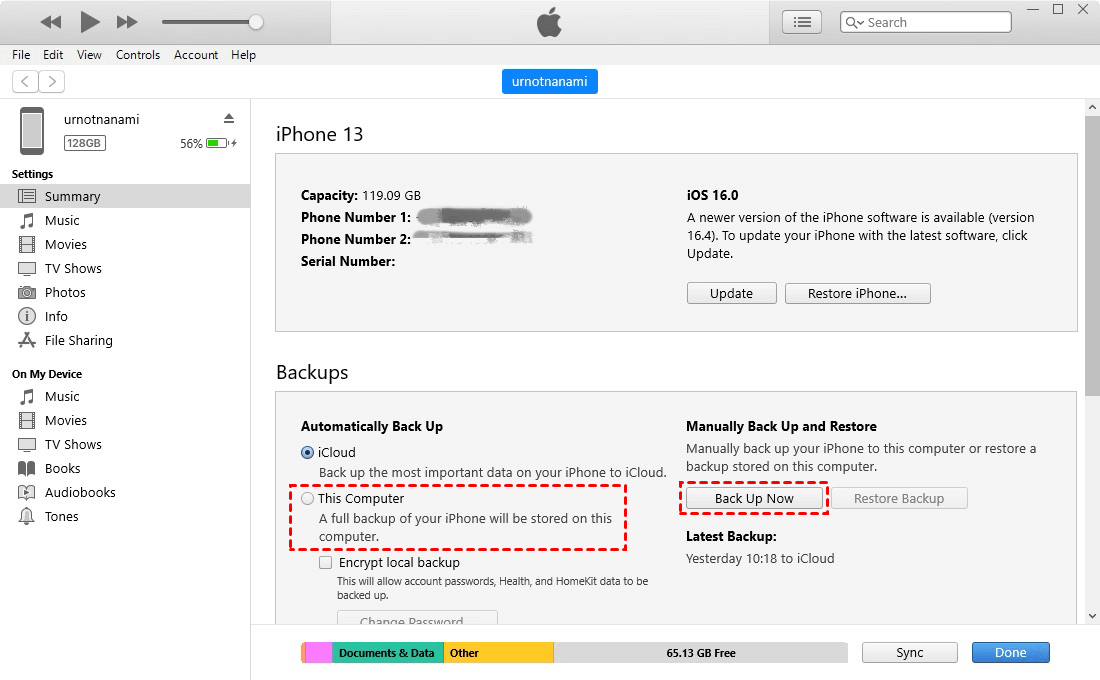
Step 2: Launch iTunes > Click the device icon in the upper left corner to access your iPhone information.
![]()
Step 3: Click Summary > Choose This Computer under the Automatically Back Up section > Then, click the Back Up Now button to commence the backup process.
- ★Tip:
- After clicking Back Up Now on iTunes, if your iPhone is running iOS 16 or later, it may prompt you to enter your passcode before starting the backup.
The backup process can take several minutes to complete. You can monitor the progress at the top of the iTunes window.
Part 2: Copy Your iPhone Backup to External Hard Drive
Once completed, your iPhone data is safely backed up to your computer. Then, you need to locate the backup file and subsequently copy it to the external hard drive for added storage security and convenience. Here is a full guide to do that:
Step 1: Navigate to your external hard drive and create a new folder with a recognizable name, such as iPhone Backup.
Step 2: Access File Explorer and copy “%appdata%\Apple Computer\MobileSync\Backup” into the address bar. This will lead you to the default folder where iTunes stores your iPhone backups.
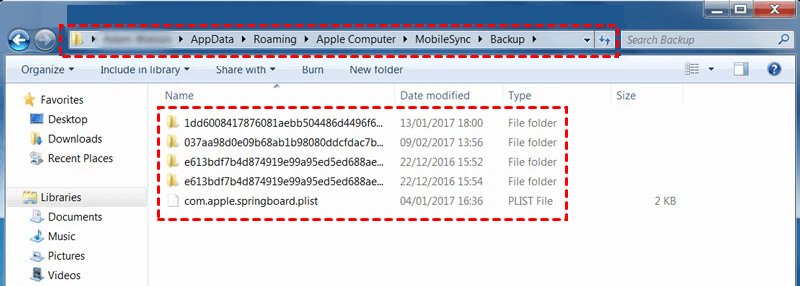
Step 3: Identify your latest backup folder based on the Date Modified column > Select and copy the latest backup folder > Paste it into the iPhone Backup folder you created on the external hard drive.
By following the two parts above, you can successfully back up your iPhone to an external hard drive using iTunes. Now, with the latest backup safely stored on the external hard drive, you can free up storage space on your PC by deleting the iPhone backup.
Bonus Tip: Backup iPhone to External Hard Drive Without iTunes
Backing up your iPhone with iTunes is not a bad option, but many users report that iTunes fails due to a poor or unstable network connection. In this case, FoneTool - a free iPhone transfer and backup tool - is highly recommended.
FoneTool is a simple but powerful iPhone backup tool for Windows PCs that allows you to back up your iPhone directly to an external hard drive without using iTunes. Some benefits of using FoneTool are listed below:
Direct Backup: FoneTool allows you to directly back up your iPhone data to the external hard drive, saving you time and avoiding unnecessary steps.
Data Preview: Before starting the backup process, you can preview and select the specific data to be backed up, ensuring that only the necessary data is transferred.
No Network Required: FoneTool doesn’t require an internet connection, so you can back up your iPhone to an external hard drive or transfer data from iPhone to iPhone without Wi-Fi or any network.
User-Friendly Interface: FoneTool has an intuitive and user-friendly interface that makes the backup process simple for all users.
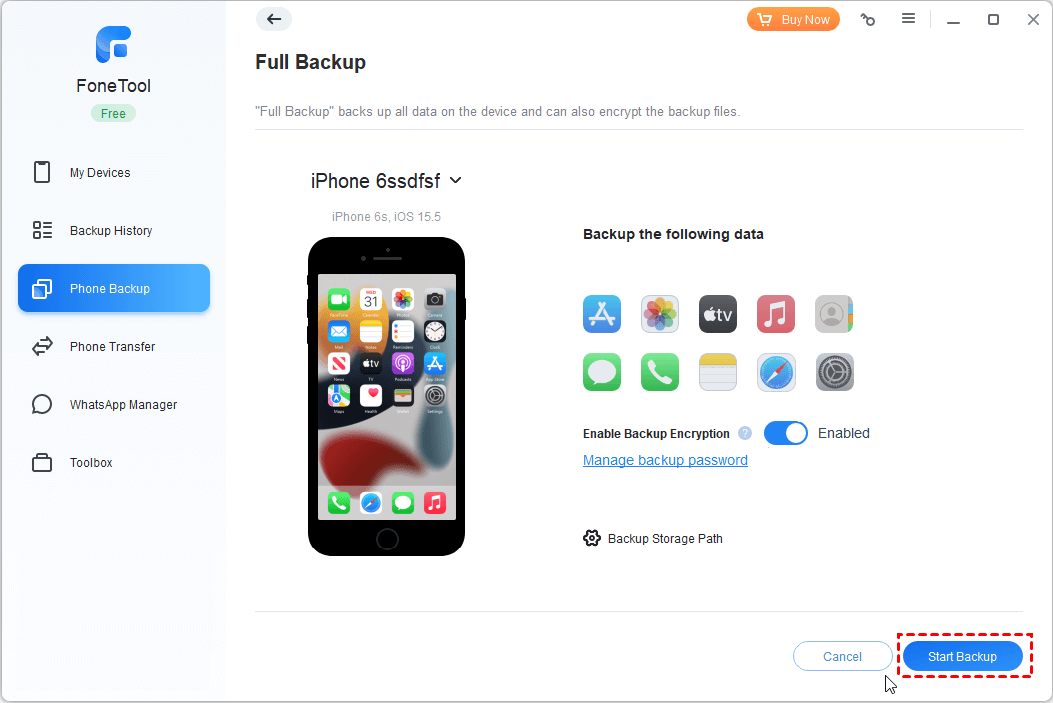
So, how to back up your iPhone data to an external hard drive using FoneTool? Follow the steps below to do that:
Step 1: Download and install FoneTool on your PC > Connect both your iPhone and external hard drive to your PC.
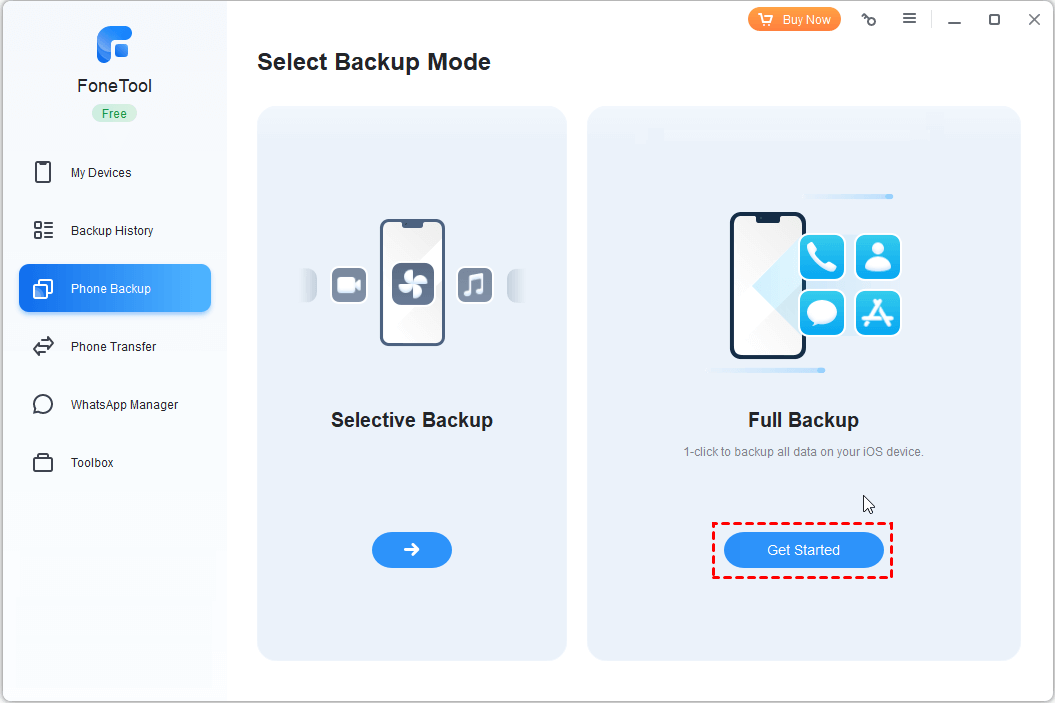
Step 2: Run FoneTool > Click Phone Backup on the left side > Click Get Started under the Full Backup section.
- ★Tip:
- If you want to selectively back up your iPhone data, you can choose Selective Backup.
Step 3: Click Backup Storage Path to specify your external hard drive as the backup destination > Enable Backup Encryption to encrypt your iPhone backup > Click Start Backup to initiate the backup process.
The Bottom Line
Now that you have how iTunes backup to external hard drive, it’s worth considering the benefits of this approach. Choosing to move your iTunes backup to an external hard drive can prove advantageous because it helps avoid cluttering your computer’s storage and offers improved security and portability for your valuable iPhone backups.
However, the method of backing up your iPhone and copying the backup to an external hard disk seems complicated. In this case, it’s highly recommended to use FoneTool, which can help you directly back up your data from iPhone to an external hard disk. In addition, FoneTool is also an iPhone management tool which lets you delete duplicate photos on your iPhone or PC, wipe your iPhone clean, etc. Try it out!
