Guide to Acer Swift 3 HDD Upgrade to SSD (No Reinstalling)
Upgrading your Acer Swift 3’s hard drive can boost your laptop performance. This guide will show you how to upgrade HDD to SSD on Acer Swift 3 without reinstalling Windows.
By Lily Updated on April 23, 2025
The Acer Swift 3 series primarily focuses on lightweight, portable designs and typically comes with SSD storage (NVMe or SATA) for faster performance. However, some older or budget-oriented models may include an HDD or a dual storage option (SSD + HDD). If your model has an HDD and you want to upgrade it to an SSD, this guide will walk you through the whole upgrade process.
Prepare for Acer Swift 3 HDD upgrade
Before upgrading your Acer Swift 3’s storage, it’s essential to make some preparations to ensure a smooth and successful upgrade without risking data loss or hardware issues.
1. Gather necessary tools and components
✅ New Drive: Choose a 2.5-inch SATA SSD for hard drive replacement. Recommended options include Samsung 870 EVO and Crucial MX500.
✅ Screwdrivers: A small Phillips-head screwdriver is required to open the laptop and secure the new drive.
✅ USB to SATA Adapter: You’ll need it to clone your existing drive to the new drive.
✅ Anti-Static Wrist Strap (Optional): Helps prevent electrostatic discharge that could damage internal components.
2. Back Up Your Data
Before making any hardware changes, it’s crucial to back up your files to avoid losing important data. You may make a backup on an external drive or cloud drive for better protection.
Stepwise guide to Acer Swift 3 hard drive upgrade
After preparations, follow this step-by-step guide to complete Acer Swift 3 hard drive upgrade smoothly.
Step 1. Connect and initialize new SSD
1. Plug the SSD into a USB port on your Acer Swift 3 via the USB-to-SATA adapter you prepared.
2. Right-click the Start menu and select Disk Management.
3. Right-click on the new SSD and select Initialize Disk. Choose the MBR or GPT partition style for SSD. It is best to use the same partition style as HDD.
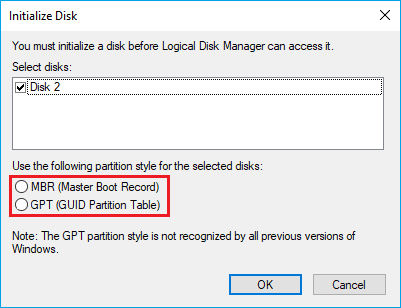
Note: If you don’t know the partition style of the old HDD, right-click on it in Disk Management and select Properties. Then go to the Volumes tab to check the partition style information.
Step 2. Transfer data from HDD to SSD
To ensure a seamless transition without reinstalling Windows and all your applications, you may clone your HDD to the new SSD using AOMEI Cloner. This tool offers all-around cloning features for a hassle-free migration.
💜Disk Clone: Copies an entire HDD/SSD (including OS, apps, and files) to a new drive.
💜System Clone: Migrates only system partition(s) to another disk.
💜Intelligent Clone: Copies only used data (skips empty space) for faster cloning.
💜SSD Alignment: Optimizes 4K sector alignment for better SSD performance and lifespan.
💜Partition Resizing: Adjusts partition sizes during cloning (e.g., expand C: drive on a larger SSD).
Now use these steps to copy HDD to SSD via AOMEI Cloner:
1. Download, install and launch AOMEI Cloner.
Easiest hard drive clone software for Windows PC & Server
2. In the main interface, click Clone > Disk Clone.

3. Select your HDD as the source disk and choose your new SSD as the destination disk.
4. Enable SSD Alignment for better performance and longevity. Then click Start Clone and wait for the process to complete.
Step 3. Swap HDD for SSD and boot
1. Turn off your Acer Swift 3 and unplug all cables.
2. Remove the back panel using a Phillips screwdriver.
3. Locate the HDD bay, gently disconnect the SATA cable and remove the old drive.
4. Secure the new SSD in the HDD bay and reconnect the SATA cable.
5. Reattach the back panel and tighten all screws.
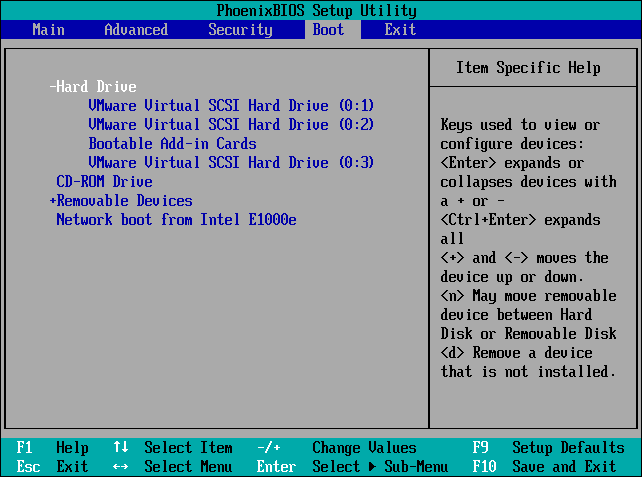
6. Power on your laptop and press F2 repeatedly to enter the BIOS.
7. Go to Boot Options and ensure the SSD is set as the primary boot drive.
8. If any changes are made, press F10 to save changes and exit. Your Acer Swift 3 should now boot from the new SSD, significantly improving performance!
Note: If your laptop doesn’t boot as expected, please refer to this article: cloned SSD won't boot.
Common issues of Acer Swift 3 hard drive replacement
While upgrading your Acer Swift 3’s hard drive can improve speed and storage capacity, you may encounter some common issues after installation. Here’s how to troubleshoot them effectively.
1. Slow Performance After SSD Upgrade
One of the possible causes is SSD not optimized for performance. You can fix it with the following methods:
✅ Enable AHCI Mode in BIOS: Restart your laptop, enter BIOS (F2 key), and check if AHCI Mode is enabled under SATA configuration.
✅ Enable TRIM for SSD Optimization: Open Command Prompt as Administrator and run fsutil behavior set DisableDeleteNotify 0.
2. Cloned SSD Shows Less Storage Than Expected
If the cloning process did not allocate full SSD capacity, you may encounter this issue. You can extend the SSD partition using Disk Management after cloning. However, Disk Management only allows you to add unallocated space to an adjacent partition.
To avoid unallocated space after cloning, you can resize partitions during the cloning process with the Edit Partitions feature in AOMEI Cloner.
To sum up
Upgrading the hard drive on your Acer Swift 3 can significantly improve performance and overall system responsiveness. This guide covers everything you need to know about the Acer Swift 3 HDD upgrade, including preparation steps, a step-by-step replacement process, and troubleshooting common issues.
The best part is that you can transfer everything from HDD to SSD via AOMEI Cloner. As a result, you don’t need to reinstall Windows and all your applications from scratch. Don’t hesitate to try it out!