How to Clone Steam Deck SSD to New SSD: Complete Guide
Looking to clone your Steam Deck SSD? This article offers a full tutorial, covering everything from pre-cloning preparation to the detailed cloning process!
By Lily Updated on April 22, 2025
Can You Clone Steam Deck SSD?
Many people choose the Steam Deck for its ability to deliver PC gaming on the go. However, concerns may arise about its storage capacity, which varies depending on the model, with options of 64GB, 256GB, or 512GB.
Is it possible to upgrade the storage on the Steam Deck? The answer is yes! You can upgrade your Steam Deck SSD by cloning Steam Deck SSD to new SSD and replacing the old one. Below I will tell you what you need to do before cloning your Steam Deck SSD and how you can easily do this using simple cloning software.
⚡ Attention: Replacing the Steam Deck SSD may increase power consumption, cause thermal issues, and affect electromagnetic compatibility, with the risk of electrostatic damage. Any damage during SSD replacement will void the warranty. It's crucial to back up your SSD beforehand to avoid mishandling or data loss.
Preparations for Steam Deck SSD Clone
This section will provide you with some preparations for Steam Deck SSD upgrade clone. Continue reading.
1. Pick a Compatible SSD
Typically, a compatible Steam Deck SSD should adhere to the following criteria:
The Steam Deck SSD size should be 2230 M.2, compatible even with the Steam Deck 64GB model.
Note that the Steam Deck 64GB model operates on the PCIe Gen 2 x1 protocol, whereas the Steam Deck 256GB and 512GB models use either the PCIe Gen 3 x4 or PCIe Gen 3 x2 protocol. When possible, ensure that the purchased M.2 SSD aligns with the correct protocol.
2. Get Professional Cloning Software
For a seamless and trouble-free cloning process, the utilization of dependable cloning software is essential. AOMEI Cloner offers a user-friendly interface, ensuring simplicity and accessibility throughout the cloning process. You can benefit a lot from its following features:
★ Intelligent Cloning: Clones only used space, optimizing storage utilization.
★ Boot Disk Cloning: Retains bootable when transferring C drive to new SSD.
★ MBR/GPT Disk Cloning Support: Supports cloning between MBR and GPT partition styles for compatibility.
★ 4K Partition Alignment: Properly aligns partitions on the target SSD, optimizing performance.
★ VSS Technology: Operates seamlessly in the background without interrupting computer usage.
★ Widely Compatible: Supports popular SSDs like Samsung/WD/Crucial/Kingston SSDs, both SATA and M.2 interfaces.
Download AOMEI Cloner and install it on your PC now.
Easiest SSD cloning software for Windows PC & Server
3. Other Necessary Tools
You’ll still need a PH1 or PH0 screwdriver and a dual M.2 NVMe SSD enclosure.
How to Clone Steam Deck SSD to New SSD
Next, we'll look at how to safely clone Steam Deck SSD to a new SSD as follows.
1. Remove the Original SSD
To minimize the risk of inadvertently puncturing a Li-Ion battery, it is advisable to discharge the Steam Deck battery below 25% before initiating any modifications. Additionally, we recommend activating battery storage mode before commencing any modding procedures. Now, let's get started.
Step 1. Begin by unscrewing and unclipping the back cover to detach and remove it.

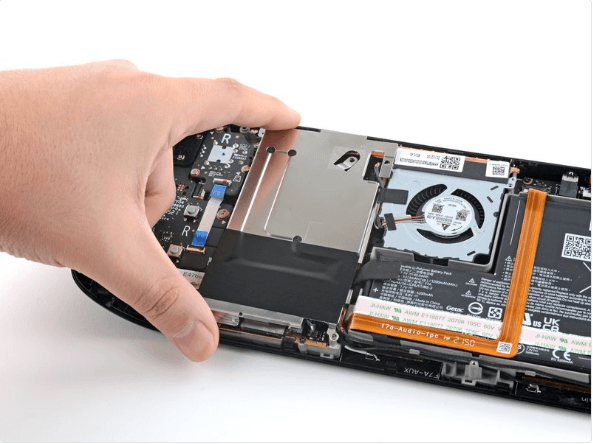
Step 2. Locate and uncover the concealed shield screw, then proceed to remove the shield.
Step 3. Disconnect the battery to ensure safety during the modding process.
Step 4. Unscrew the SSD fastening, followed by the removal of the SSD itself.
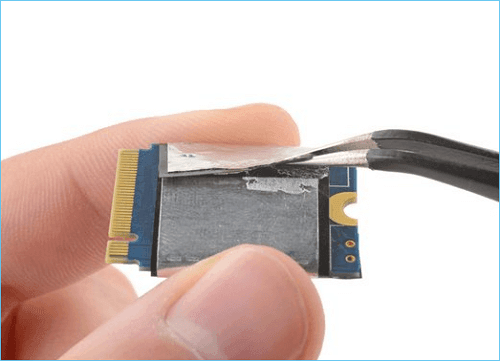
Step 5. Eliminate the SSD shielding and extract the original SSD from the Steam Deck.
2. Transfer Data from Old SSD to New SSD
Follow the instructions below to clone Steam Deck SSD to a larger SSD using professional cloning software - AOMEI Cloner.
Step 1. Connect two M.2 SSDs to your PC via the dual M.2 NVMe SSD enclosure. Launch AOMEI Cloner and select Clone > Disk Clone.

Step 2. Select the original Steam Deck SSD as the source disk and then click Next.
Step 3. Choose the larger new SSD as the destination disk, then click Next.
Note: If the destination disk contains any data, you will receive a window prompting you to make a backup first. If you have already made a backup or you don’t need the data any more, click OK to continue.
Step 4. Activate SSD Alignment to ensure peak performance, and then proceed to initiate the SSD cloning process by clicking Start Clone.
Note: To avoid unallocated space after cloning, you may employ the Edit Partitions feature. Opt for "Add unused space to all partitions" or "Manually adjust partition size" to ensure a smooth and effective cloning experience.
3. Put New SSD to Steam Deck
After cloning, you can insert the new SSD into the Steam Deck and ensure it functions seamlessly like the old SSD. Follow these steps:
Step 1. Position the foil shielding removed from the old SSD onto the new SSD.
Step 2. Insert the new SSD into the slot and secure it in place with screws.
Step 3. Reconnect the battery by carefully pushing the connector back into the battery port using the fabric strip. Upon successful connection, the power light will briefly flash white.
Step 4. Reattach the shielding by sliding it back into place, aligning it with the screw holes underneath. Confirm that the fan wires are positioned above the shield.
Step 5. Reconnect and secure the back plate by placing it on top of the Steam Deck and screwing it in place. Double-check to ensure everything is properly aligned and secured.
Summary
For a hassle-free experience, we recommend revisiting the guide from the start when disassembling the Steam Deck to follow the correct order. This tutorial allows you to upgrade the Steam Deck SSD without the need for Rufus or creating bootable images.
AOMEI Cloner makes it a piece of cake to clone Steam Deck SSD to a new SSD. It ensures a seamless cloning of Steam OS and other game data from the old SSD to the new one. Download this software now to start Steam Deck SSD clone!