[Top Fixes] to Inaccessible Boot Device After Clone
Cloned your drive and now Windows won’t boot? Learn how to fix the inaccessible boot device after clone error with effective solutions here.
By Lily Updated on April 22, 2025
Key reasons for inaccessible boot device after clone
So, you’ve just cloned your drive—maybe to a faster SSD or a new NVMe—and suddenly you're staring at the dreaded "Inaccessible Boot Device" error. It’s frustrating, but not uncommon. Here’s why it happens.
🎯BIOS/UEFI Boot Mode Mismatch: MBR needs Legacy boot, GPT needs UEFI. If the BIOS is set to the wrong mode for your cloned disk’s partition style, Windows can’t find the bootloader, resulting in boot failure.
🎯Incorrect SATA Controller Settings: If you change your SATA mode from IDE to AHCI or RAID (or vice versa) after cloning, and Windows wasn’t prepared for that change, the system will fail to boot.
🎯Incompatible or Missing Storage Drivers: When you clone a system drive, especially from SATA to NVMe or from a different controller type (RAID to AHCI, for example), Windows may not recognize the new hardware during boot.
🎯Incomplete or Improper Clone: If the BCD (Boot Configuration Data) or MBR/GPT structures are damaged or missing during cloning, Windows won’t boot.
How to fix Windows 10 inaccessible boot device after clone
If you encounter inaccessible boot device for Windows 10 after clone, try the following ways to fix it.
If you're tired of chasing BIOS tweaks and boot commands, it's worth switching to a powerful cloning tool.
Fix 1: Boot into Safe Mode
Before diving into advanced recovery tools, try Safe Mode. It is the magic trick that gets past the inaccessible boot device error after a clone.
1. Create a Windows installation USB or recovery disk using another PC. You can use the Windows Media Creation Tool for this.
2. Boot your PC from the recovery media. When the Windows Setup screen appears, click Next > then Repair your computer.
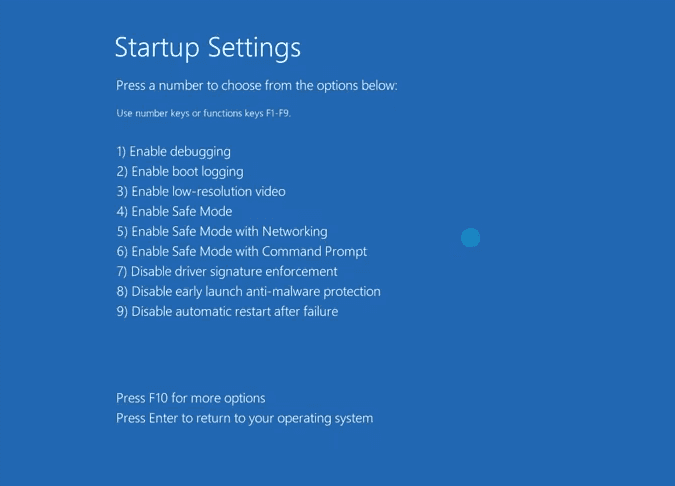
3. Navigate to Troubleshoot → Advanced options → Startup Settings → Click Restart.
4. Once your system restarts, press 4 or F4 to boot into Safe Mode.
5. If Windows loads in Safe Mode, simply restart normally after that.
Fix 2: Change BIOS/UEFI Boot Mode
Follow the instructions below to fix BIOS/UEFI boot mode mismatch:
1. Restart your PC and press the setup key (usually Del, F2, or Esc) as soon as the manufacturer logo appears.
2. Look for a setting called Boot Mode, UEFI/Legacy Boot, CSM Support, or UEFI/Legacy BIOS. The exact name depends on your motherboard or laptop manufacturer.
3. Switch to the correct mode:
- If your cloned drive uses GPT, set boot mode to UEFI.
- If your cloned drive uses MBR, set boot mode to Legacy or Enable CSM.
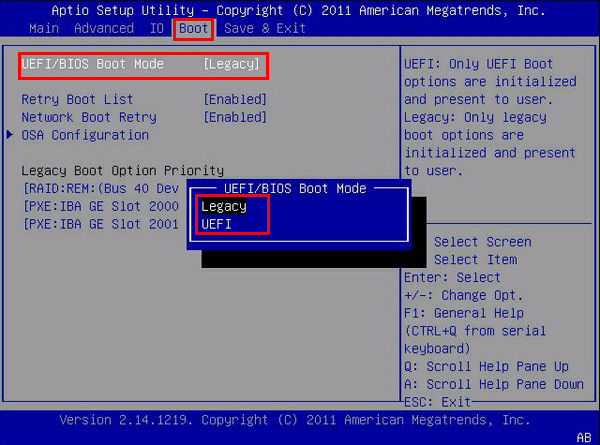
4. Press F10 to save changes and reboot.
✍ Tip:
You can check your partition style on the cloned drive by connecting it to another working PC:
● Open Disk Management.
● Right-click the drive > Properties > Volumes tab > Look for Partition style: MBR or GPT.
Fix 3: Change SATA Controller Settings
If your original disk was set up in AHCI, but your BIOS is now set to RAID or IDE (or vice versa), Windows might try to load the wrong storage driver—and fail to boot as a result. Learn how to fix it below:
1. Restart your PC and tap the BIOS key (Del, F2, F10, etc.) repeatedly during boot.
2. Look under tabs like Advanced, Integrated Peripherals, or Storage Configuration. Then locate a setting labeled SATA Mode, SATA Configuration, or Storage Controller Mode.
3. Switch the mode:
- If it’s set to IDE or RAID, change it to AHCI (most common for SSDs).
- If it was originally RAID and you cloned to a RAID setup, leave it there.
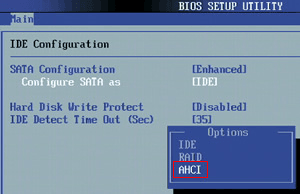
4. Press F10 to save changes and reboot.
✍ Tip:
If you suspect the correct mode is AHCI but Windows wasn’t prepared for it, follow these steps to fix the boot error:
● Boot into Safe Mode (see Fix 1).
● Once in Safe Mode, restart normally. Windows should load with AHCI drivers now enabled.
● Reboot and confirm the error is resolved.
Fix 4: Install the NVMe Driver and Re-clone
After cloning from one storage type to another like SATA to NVMe, Windows may lack the drivers it needs to boot on the new hardware. Learn how to fix inaccessible boot device after clone to NVMe below:
1. Start the computer using the old hard drive.
2. Launch the Command Prompt and run the following command:
sc config stornvme start= boot
✍ Tip: This command adjusts the startup drivers for a cold boot, switching to stornvme to ensure proper booting from the new NVMe drive.
3. Reconnect the NVMe drive and clone the old hard drive to it again. Afterward, verify that the system boots correctly from the NVMe drive.
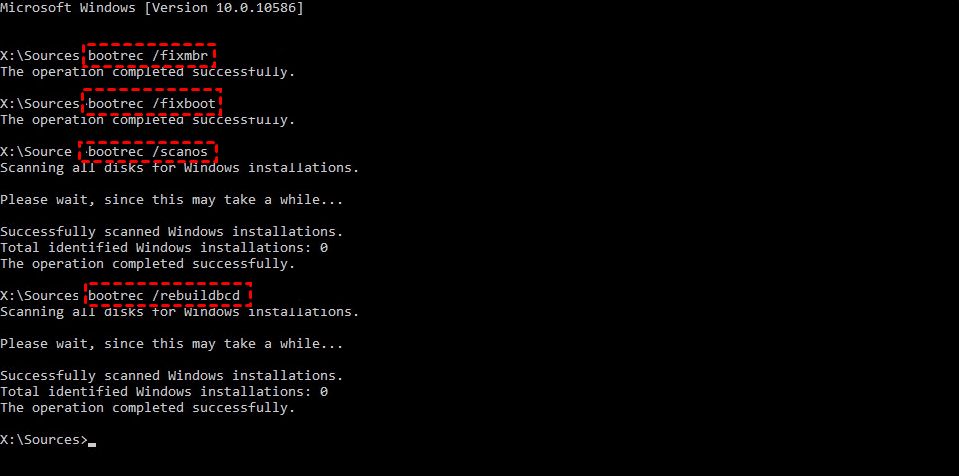
Fix 5: Rebuild the BCD and MBR
Cloning tools sometimes fail to recreate a proper bootloader on the new drive. You may use the following steps to rebuild the BCD and repair the boot sector:
1. Boot your PC from the recovery media (see Fix 1). On the install screen, click Repair your computer > Troubleshoot > Advanced options > Command Prompt.
2. In the pop-up command prompt, type the following commands to fix Windows 10 fails to boot.
- bootrec /fixmbr
- bootrec /fixboot
- bootrec /scanos
- bootrec /rebuildbcd
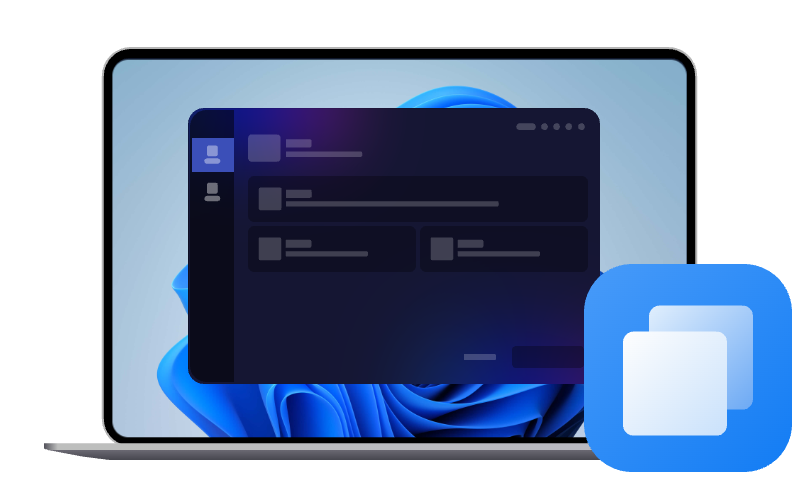
Fix 6: Try a Reliable Clone Tool - AOMEI Cloner
Still stuck with the inaccessible boot device after clone error after trying all the fixes? It's time to switch to a professional-grade cloning tool - AOMEI Cloner.
🌟 Flexible Cloning Options: It offers Disk Clone to migrate the entire hard drive, System Clone to move only the operating system, and Partition Clone for copying specific partitions with precision.
🌟Intelligent Clone: Easily clone a larger HDD to a smaller SSD, as long as the target drive has enough space for the used data—no need for a 1:1 match in drive size.
🌟 Broad Hardware Compatibility: Supports all major disk types and interfaces, including SATA/IDE/PCIe disk, M.2 drive, NVMe SSD, etc.
🌟 Rescue Media Creation: It allows you to clone hard drive with bootable USB, no need to boot into Windows.
Follow the guidance below to clone your hard drive with AOMEI Cloner:
1. Start the computer using the old hard drive.
2. Download, install and launch AOMEI Cloner on your PC. Then click Clone > Disk Clone.

3. Select your source disk (the one you want to clone) and destination disk (where the clone will go) respectively.
4. Configure the clone task with Edit Partitions, SSD Alignment, and Sector By Sector Clone as necessary. Finally, launch the cloning process by clicking Start Clone.
5. Swap in the cloned drive and boot your computer normally.
The end
Running into the inaccessible boot device after clone error can feel like hitting a wall right when you thought the hard part was over. But as you’ve seen, this issue is usually fixable with the right steps.
If the issue still exists after adjusting BIOS settings, installing drivers, and repairing the bootloader, switching to a professional solution like AOMEI Cloner can save you hours of frustration. Don’t hesitate to try it out!