By
Delia
![]() / Last update
December 10, 2024
/ Last update
December 10, 2024
Some users have found that their computers heat up badly after updating to the new Windows 11 system and using it for a while. What causes this and how to solve it? Let's look at some common cases below.
Tip 1. Restart the computer
In many cases, computer overheating is the result of a specific process or program running in the background. It overloads the CPU and causes the system to overheat. A quick solution is to restart the computer to eliminate any such processes.
However, you must understand that restarting Windows 11 is only a temporary fix. If such problems occur frequently, you still need to try other solutions. If such problems occur frequently, you still need to try other solutions.
Tip 2. Make sure the computer is placed correctly
Improperly placed computers can also cause Windows 11 overheating problems. If the CPU is placed in a situation where the hot air from the fan is not free to escape, the computer is bound to overheat.
In the case of a laptop, avoid placing it on a bed or similar surface, as hot air will be released from the bottom surface. In addition, you can use a cooling pad to control overheating and improve the performance of your computer.
Tip 3. Check the computer fan
If the computer fan is running at a reduced speed or has stopped working altogether, the system will overheat. This could be due to dust accumulating inside the fan, obstruction caused by wires, or a motor failure.
Computer fan problems are easy to fix, but you must be aware of the various components and connections. If you are not familiar with them, it is best to contact a professional. After cleaning and repairing your laptop, check if the overheating problem in Windows 11 has been solved.
Tip 4. Update to the latest version of Windows 11
Running outdated versions of Windows can also lead to overheating. Each update introduces new features, bug patches, and other performance enhancements.
Therefore, it is recommended that you keep Windows 11 up to date.
1. Press Windows+I to launch Settings.
2. Select “Windows Update” from the list of tabs in the left navigation pane.
3. Click “Windows Update” on the right.
4. Click “Check for Updates” to scan for any available update versions.
5. Download and install the update that is displayed after the scan.

Tip 5. Disable startup applications
There are many applications on your PC that load when you open them. In addition to unnecessarily using system resources and causing overheating, these add to the time it takes for Windows to start. A simple solution here is to disable these applications.
Remember not to delete all applications that appear in the Startup tab, as some of them perform critical functions. When you are done, restart your computer and check if the overheating problem in Windows 11 has been solved.
1. Press Ctrl+Shift+Esc to launch Task Manager.
2. Navigate to the Startup tab to view the applications that are loaded when you start Windows.
3. Select the app you want to remove, and then click “Disable”. Or, you can right-click it and select “Disable” from the context menu.
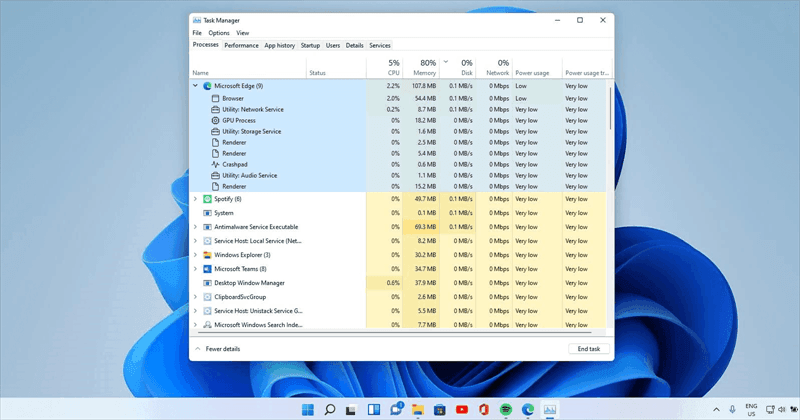
Tip 6. Terminating applications and processes
There are a bunch of non-critical applications and processes running in the background that take up system resources. If you are experiencing overheating problems in Windows 11, eliminating these tasks will come in handy and solve the problem.
As in the previous case, not all processes should be terminated. Some of them may consume a lot of resources, but are essential for the operation of Windows.
1.Press Ctrl+Shift+Esc to launch Task Manager.
2. In the Performance tab, scroll through the list of programs and identify the ones that consume system resources.
3. Select the task you want to terminate, and then click the “End Task” button at the bottom.
You can similarly disable the other applications and processes listed here in case you don't need them.
Tip 7. Disable applications from running in the background
When you change the background application permission to Never, the application will not run in the background at all, thus clearing a lot of resources and solving the overheating problem in Windows 11. It is actually recommended that you disable most of the non-critical ones anyway, as they consume resources and cause overheating. Nevertheless, you can always start them manually when needed.
1. Press Windows+I to launch the Settings application.
2. Select the “Apps” tab from the left navigation pane.
3. Next, click “Apps & features” on the right.
4. Find the application you don't want to run in the background, click the ellipsis next to it, and then select “Advanced ptions” from the menu that appears.
5. Now, scroll down to “Background apps permissions” and click the menu below it to let this application run in the background.
6. Select “Never” from the list of options that appears.
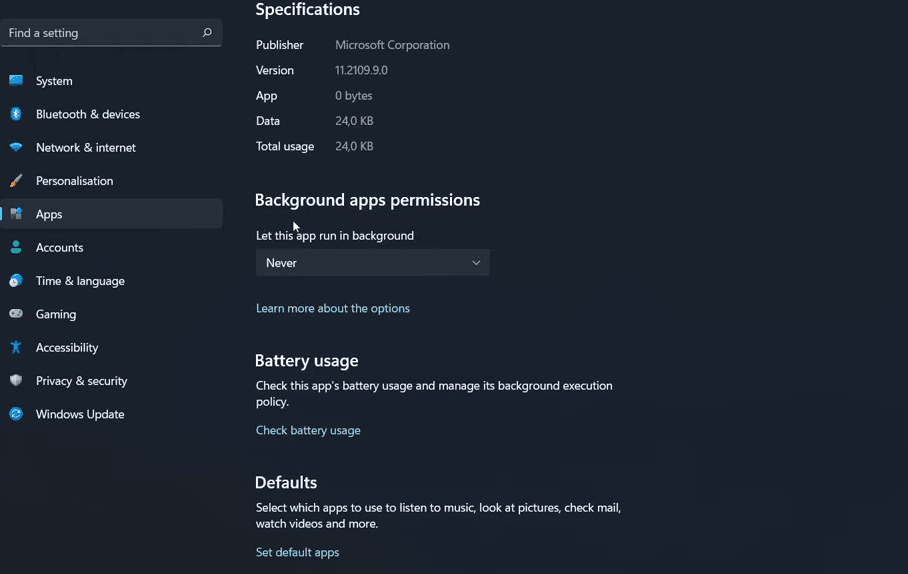
You can use this way to disable other applications from running in the background.